![]()
What is Bld
Bld is a CI/CD tool that targets to build pipelines both in a local environment and in a server.
Building
Bld is built using the Rust programming language so you will need a Rust installation in order to compile it.
External dependencies
Additionally the project requires some external dependencies:
- build-essential
- pkg-config
- libssl-dev
- libsqlite3-dev
- (optional) docker
- (optional) trunk (for the server UI)
- (optional) nodejs (for the server UI)
The package names are for Debian based distributions, install the appropriate packages on your distribution of choice.
Build instructions
Once you have installed all of the above, you can build the project as follows
$ git clone https://github.com/Kani-Maki-Gang/bld.git
$ cd bld
$ cargo build --release
$ ./target/release/bld --version
The bld_server crate requires for a
static_filesdirectory to exist in its project structure and if it doesn't build error will appear since it tries to embed all of its files to the resulting binary. There is abuild.rsfile for the project that creates the directory but if you encounter any issues, create the directory manually.
Bld also has a UI for its server that you can build it by running the below command
$ cd crates/bld_ui
$ trunk build
Remember to have the trunk and nodejs installed in order to build the UI.
Musl and Mingw builds
Since there are multiple dependencies deployment of bld can be difficult, so the project supports targeting musl for static linking in Unix like operating systems while supports mingw for Windows. If you have an existing bld binary locally built/installed then follow the below instructions. This steps require a docker, podman or other container engine installed.
$ bld run -p pipelines/build.yaml
$ ls dist
Or you can use cargo to built bld for your system and then run the pipelines for the musl build
$ cargo run -- run -p pipelines/build.yaml
$ ls dist
With the above a new container will be built with all the necessary dependencies for building the project and the bld pipeline will clone the repository, build the binary and the copy it in the dist directory.
If a bld binary is not available, you will have to start a container with the bld-image and do the steps manually.
Installation
For a prebuilt version of bld go to the github releases page and download the latest version.
Creating a project
If you have followed the above Building section and have a Bld binary available, you can execute the below commands to initialize a Bld directory.
$ bld init
This will create a .bld directory with 2 files
config.yamlWhich contains the configuration for the current directorydefault.yamlThe default pipeline which simply echos a 'hello world'
To test out the default pipeline simply execute
$ bld run -p default.yaml
The pipeline will execute on your machine, but it can be changed to target a docker container. Below is the same default pipeline but having the runs-on section changed to target an ubuntu docker image, just make sure it is installed.
runs_on: ubuntu
version: 2
jobs:
  main:
  - echo 'hello world'
Creating pipelines
In order to make new pipelines, you just need to create a yaml file under the .bld directory. For better structure you can add pipelines in directories and give the relative path to bld.
For example given a sample project you might want to have a build and deploy pipelines, the structure could be done as
.bld
 |    config.yaml
 |    default.yaml
 └─── sample
      |    build.yaml
      |    deploy.yaml
And the pipelines can be run with their relative path inside the .bld directory.
$ bld run -p sample/build.yaml
$ bld run -p sample/deploy.yaml
Quick pipeline example
If you want a quick example of how a more involed pipeline would look, lets take the below example that tries to build a .net project and also run static analysis that will be sent to a sonar qube instance.
This is the example pipeline that runs the scanner called example-project/scanner.yaml
name: Example .net project sonar scanner pipeline
version: 2
runs_on:
  dockerfile: /path/to/custom-dockerfile-for-scanner
  tag: latest
  name: scanner

variables:
  branch: master
  key: ExampleProject
  url: http://some-url-for-sonar-qube
  login: some_login_token

jobs:
  main:
  - git clone ${{branch}} https://some-url-for-the-repository
  - working_dir: /example-project/src
    exec:
    - dotnet sonarscanner begin /k:"${{key}}" /d:sonar.host.url=${{url}} /d:sonar.login="${{login}}"
    - dotnet build
    - dotnet sonarscanner end /d:sonar.login="${{login}}"
This is the example pipeline that builds the release version of the project called example-project/build.yaml
name: Example project build pipeline
version: 2
runs_on:
  image: mcr.microsoft.com/dotnet/sdk:6.0-focal
  pull: true

variables:
  branch: master
  config: release

artifacts:
- method: get
  from: /example-project/src/ExampleProject/bin/${{config}}/net6.0/linux-x64
  to: /some/local/path/example-project/${{bld_run_id}}
  after: main

jobs:
  main:
  - git clone -b ${{branch}} https://some-url-for-the-repository
  - cd /example-project/src/ExampleProject && dotnet build -c ${{config}}
This is the example pipeline called example-project/deploy.yaml that runs on the host machine that initiates both pipelines in parallel and also makes a simple deployment of the release build.
name: Example project deployment pipeline
version: 2
runs_on: machine

variables:
  branch: master

external:
- pipeline: example-project/sonar.yaml
  variables:
    branch: ${{branch}}

- pipeline: example-project/build.yaml
  variables:
    branch: ${{branch}}

jobs:
  scanner:
  - ext: example-project/scanner.yaml

  build_and_deploy:
  - ext: example-project/build.yaml
  - scp -r /some/local/path/example-project/${{bld_run_id}} user@some-ip:/some/path/to/the/server
In the above the scanner pipeline runs parallel to the build and deploy since they are set in 2 different jobs. If everything should be run sequentially then the call to the scanner pipeline could be added to the same job as the other steps.
Graceful shutdown
Since each run could create and run container as well as issue remote runs to bld servers, the cli handles the SIGINT and SIGTERM signals in order to properly cleanup all of the external components. To be noted that the stop command which stops a pipeline running on a server, can be used for a graceful early shutdown of a pipeline.
Github action
Bld has an alpha version of a github action called bld-action and you can access the repository here.
The action will look inside a repository to find the .bld directory in order to run the bld binary. An example that runs a pipeline with one variable is shown below:
name: Demo workflow

on:
  push:
    branches: ["main"]

jobs:
  build_musl:
    runs-on: ubuntu-latest
    name: Run demo
    steps:
      - name: Checkout
        uses: actions/checkout@v3
      - name: Run pipeline
        uses: Kani-Maki-Gang/bld-github-action@v0.2.1-alpha
        with:
          pipeline: 'demo_pipeline.yaml'
          variables: |-
            branch=main
How to configure bld
You can edit the config.yaml file inside a .bld directory in order to configure both local options and add new target bld servers.
Local configuration
The local section of the configuration has the below options available
ability mode.
-
docker_url: The url with which a connection will be established to the docker engine API. This can be either a single url or multiple urls, defined with a name and the ability to set a default.
-
server: The start of the server section with the below options
- host: The host that the server will be exposed to.
- port: The port that the server will be exposed to.
- tls: The start of the tls section with the below options
- cert_chain: The path to a certificate file.
- private_key: The path to the private key for the above certificate.
- pipelines: A path to a directory in which the server will store registered pipelines.
- auth: The authentication section for the server.
- method: A text option that for the current release only accepts the value oidc.
- issuer_url: The issuer url for the authorization provider.
- redirect_url: The redirect url of the bld server.
- client_id: The client id configured in the oidc provider for the bld server.
- client_secret: The client secret for the bld server.
- scopes: An array of scopes provided when logging in.
- user_property: The property that a user will be associated with. Accepts the values name or email.
- logs: A path to a directory where the logs for each server run will be stored.
- db: The database connection url for
postgres,mysqlorsqlite.
-
supervisor: The start of the supervisor section
- host: The host that the supervisor will be exposed to.
- port: The port that the supervisor will be exposed to.
- tls: The start of the tls section with the below options
- cert_chain: The path to a certificate file.
- private_key: The path to the private key of the above certificate.
- workers: A number that indicates how many worker processes can the supervisor spawn. This will be the maximum number of active pipeline runs on a server, with all other being queued.
-
editor: The name or path to your editor of choice for editing a pipeline through the bld cli.
-
ssh: The ssh global configuration that pipelines can use to establish an ssh connection.
-
registries
new to v0.4.x: A section to define properties about available registries and credentials to access them if they are private.- url: The url of the registry.
- username
optional: The username to access the registry. - password
optional: The password to access the registry.
Remote configuration
The remote section of the config file is an array of servers that can be targeted. The available options are below.
- server: The name used to target this entry.
- host: The host address of the server.
- port: The port of the server.
- tls: A boolean indicating to use secure protocols when connecting to the server.
Putting it all together
Below is an example configuration with all of the above options
local:
  server:
     host: localhost
     port: 6080
     tls:
        cert_chain: path/to/server_certificate.crt
        private_key: path/to/server_private.key
     auth:
        method: oidc
        issuer_url: https://some_issuer_url
        redirect_url: https://localhost:6080/authRedirect
        client_id: some_client_id
        client_secret: some_client_secret
        scopes: ["scope1", "scope2"]
        user_property: email
     pipelines: .bld/server_pipelines
     logs: .bld/logs
     db: sqlite:///path/to/project/.bld/db/bld-server.db
  supervisor:
     host: localhost
     port: 7080
     tls:
        cert_chain: path/to/supervisor_certificate.crt
        private_key: path/to/supervisor_private.key
     workers: 50
  # Using a single docker url
  # docker_url: unix:///var/run/docker.sock
  # Multiple docker urls
  docker_url:
    unix:
        url: unix:///var/run/docker.sock
        default: true
    tcp: tcp://127.0.0.1:2376
  editor: vim
  ssh:
     test_server_1:
         host: 192.168.122.3
         user: test_user
         userauth:
             type: keys
             public_key: /path/to/public_key
             private_key: /path/to/private_key
     test_server_2:
         host: 192.168.122.4
         user: test_user_2
         userauth:
             type: password
             password: some_password
     test_server_3:
         host: 192.168.122.5
         user: test_user_3
         userauth:
             type: agent
  registries:
    docker_io:
        url: https://docker.io
    ghcr:
        url: https://ghcr.io
        username: some_username
        password: some_password

remote:
- server: local_1
  host: 127.0.0.1
  port: 6080
  tls: true
- server: local_2
  host: 127.0.0.1
  port: 8080
Pipeline syntax
Bld pipelines are built with backwards compatibility in mind, meaning that after a bld update existing pipelines will not break even if new functionality is introduced or the pipeline changes all together.
This is achived through a version number that is seperate from the release version of bld. When a breaking change is introduced in the pipeline syntax, in order to support new features, a pipeline version bump will happen thus all existing pipelines will execute with the set of features they were designed and will not break. This is done to let the user migrate to a new pipeline syntax at their leasure.
The current pipeline versions are
- Version 1
- Version 2
latest
Version
The version field is a mandatory field that indicates which specific features are available to a pipeline. A new pipeline version is created when a breaking change must be done in the pipeline yaml structure for a specific feature to be supported. Additionally each version has a dedicated runner which means that a new version of bld will execute the existing pipelines as before.
An example of defining a version is below.
version: 2
Pipeline versions are independent of the bld version, since the pipeline execution or structure might not change at all between releases.
The current available versions and features are listed below.
| Feature | Version 1 | Version 2 |
|---|---|---|
| Execute commands on host machine | Yes | Yes |
| Execute commands on an existing container image | Yes | Yes |
| Execute commands on a container image that can be pulled if not found | No | Yes |
| Execute commands on a container image that is built directly through a Dockerfile | No | Yes |
| Execute commands on a server with an ssh connection | No | Yes |
| Run parallel jobs | No | Yes |
| Support for variables | Yes | Yes |
| Support for environment variables | Yes | Yes |
| Call child pipelines with the ability to provide variables and environment variables | Yes | Yes |
| Prevent disposal of platform at the end of a run | Yes | Yes |
Name
Supported in pipeline versions:
version 1,version 2
The name field is optional and simply will print out the defined value at the start of the pipeline's execution. An example usage is below:
name: An example pipeline name
Note: The name field supports expressions so a variable, an environment variable or a keyword can be used.
Runs_on
The runs_on field in the pipeline defines the platform of execution and currently the latest version of the pipeline syntax supports the below:
- machine
- container
- ssh connection
Machine platform
Supported in pipeline versions:
version 1,version 2
The machine platform indicates that all commands will be executed directly on the host machine. The bld runtime will also create a temporary directory in .bld/tmp path with a unique Uuid as a directory that can be used for the run which will be cleaned up afterwards.
To use the machine platform simply use the below top level statement.
runs_on: machine
Container platform
The container platform is used so that commands defined in the pipeline are executed inside a docker container using an exec instance. The container platform supports various types of configuration.
Run commands on existing docker images
Supported in pipeline versions:
version 1,version 2
To run commands on existing docker images. This option simply will try to create a new container at the start of the run based on the name of the provided image, if the image doesn't exist then the container won't be created. The user is responsible for maintaining the docker images in this case. As an example below we define this type of container platform for the latest ubuntu image.
runs_on: ubuntu
Run commands on existing or missing docker images
Supported in pipeline versions:
version 2
This type of the container platform is similar to the previous one but it can define the option to pull the docker image when the run starts. If the pull option is active then the run will look up the image, pull it if neccessary and then start the run on the created container. As an example to define such platform for the ubuntu image you can use the below top level statement.
runs_on:
    image: ubuntu
    pull: true
To pull a specific image tag you can use the : notation similar to the example below.
runs_on:
    image: ubuntu:20.04
    pull: true
Optionally you can specify the docker url to be used for the pull operation based on the defined urls in the bld configuration file. Remember that the docker url is the name of the target url.
runs_on:
    image: ubuntu:20.04
    pull: true
    docker_url: unix_socket_docker_url
Last but not least you can define the docker registry to be used for the pull operation based on the defined registries in the bld configuration file or by setting a specific configuration for the pipeline.
# Look up the registry in the global configuration
runs_on:
    image: ubuntu:20.04
    pull: true
    registry: ghcr

# Define the registry in the pipeline configuration
runs_on:
    image: ubuntu:20.04
    pull: true
    registry:
        url: ghcr.io
        username: some_username
        password: some_password
Run commands on images built from a Dockerfile
Supported in pipeline versions:
version 2
This type of container platform leverages a Dockerfile to build an image based on specified configuration and then run the provided commands on a new container created with this image. As an example to create such a platform use the below top level statement.
runs_on:
    dockerfile: /path/to/dockerfile
    name: custom-image
    tag: latest
Optionally you can specify the docker url to be used for the pull operation based on the defined urls in the bld configuration file. Remember that the docker url is the name of the target url.
runs_on:
    dockerfile: /path/to/dockerfile
    name: custom-image
    tag: latest
    docker_url: unix_socket_docker_url
Ssh platform
Supported in pipeline versions:
version 2
The ssh platform exists in order to make the execution of multiple commands over an ssh connection easier. A user could always directly use the ssh binary in a command that is executed in a diffferent platform.
An example of using this platform is shown below:
runs_on:
    host: 127.0.0.1
    port: 22
    user: some_user
    userauth:
        type: password
        password: the_user_password
Additionally you can define a global configuration for ssh connections in the .bld/config.yaml file and use the name of the configuration in the runs_on field as show below. See the Server > SSH section for more information on the global configuration.
runs_on:
    ssh_config: my_global_ssh_config_key
Note here that this platform always expects the host, user and userauth fields with the port field being optional having a default value of port: 22 if not provided. Additionally the userauth field has 3 types of authentication that can be defined.
Password user authentication
The password authentication type for the ssh platform uses a password directly that is passed to the ssh connection when that is established. To define such user authentication you can use the below statement:
userauth:
    type: password
    password: the_user_password
Keys user authentication
The keys authentication type uses a private and a public key when establishing the ssh connection, and such a configuration can be done using the below statement:
userauth:
    type: keys
    public_key: /path/to/public_key
    private_key: /path/to/private_key
The private_key field is mandatory but the public_key is optional.
Agent user authentication
This type attemps to perform ssh agent authentication and can be configured using the below statement:
userauth:
    type: agent
Cron
Supported in pipeline versions:
version 2
The cron field is optional and can configure the execution of a pipeline in a schedule that is defined using the cron syntax.
This field is only supported for server runs and doesn't affect local runs. Additionally it will set up a scheduled execution with the default values for variables and environment variables, if a more parameterized scheduled job is required please visit the cron cli subcommand.
An example use case it would be to execute a pipeline every 10 seconds
cron: 10 * * * * * *
Dispose
Supported in pipeline versions:
version 1,version 2
The dispose field is optional and when set to true, it wont clean up after a pipeline run.
Specifically
- For the machine platform the temporary directory that is created under the
.bld/tmp/path with a Uuid directory for the run, won't be deleted. - For the container platform the container itself won't be stopped and removed.
- Dispose is ignored for the
sshplatform, since the ssh connection will close once the run finishes.
Variables
Supported in pipeline versions:
version 1,version 2.
The syntax between the pipeline versions differ so all examples will be presented for both.
The variables section is a hashmap where the key is the variable name and the value is its default value. The value of a variable can be modified by the user when running the pipeline.
Based on the first example, that was rather specific, we could enhance our pipeline with a variable to either list the content of the target_directory or another one specified when using the run subcommand. Below is a configured pipeline with a variable
version 1
name: Example pipeline with variables 1
runs_on: machine
version: 1

variables:
  directory: /home/user/target_directory

steps:
- name: List all content of target_directory
  exec:
  - ls bld:var:directory
version 2
name: Example pipeline with variables 1
runs_on: machine
version: 2

variables:
  directory: /home/user/target_directory

jobs:
  main:
  - ls ${{directory}}
Here we see the syntax for using a Bld variable, configuring its name and default value. It can be used with the format bld:var:directory for version 1 and ${{directory}} for version 2. You can run the pipeline normally and leave the value as is or you can use the -v or --variable option of the run subcommand
$ bld run -p example.yaml -v directory=/home/kvl/another_directory
We can define multiple variables
version 1
name: Example pipeline with variables 2
runs_on: machine
version: 1

variables:
  first_directory: /home/user/target_directory
  second_directory: /home/user/another_directory
  third_directory: /home/user/yet_another_directory

steps:
- name: List content of all directories
  exec:
  - ls bld:var:first_directory
  - ls bld:var:second_directory
  - ls bld:var:third_directory
version 2
name: Example pipeline with variables 2
runs_on: machine
version: 2

variables:
  first_directory: /home/user/target_directory
  second_directory: /home/user/another_directory
  third_directory: /home/user/yet_another_directory

jobs:
  main:
  - ls ${{first_directory}}
  - ls ${{second_directory}}
  - ls ${{third_directory}}
And set new values using the cli
$ bld run -p example.yaml -v first_directory=some_path -v second_directory=some_other_path -v third_directory=some_yet_another_path
Note: The variable fields support expressions so a variable, an environment variable or a keyword can be used as a variable's default value.
Environment variables
Supported in pipeline versions:
version 1,version 2.
The syntax between the pipeline versions differ so all examples will be presented for both.
Same with the variables section, the environment variables section is a hashmap where the key is the variable name and the value is its default value. The value of an environment variable can be modified the user when running the pipeline.
Just like with variables, they can be used with the same format as a variable with the bld:env: prefix for version 1 and the ${{ ... }} syntax for version 2.
version 1
name: Example pipeline with environment variables 1
runs_on: machine
version: 1

environment:
  first_directory: /home/user/target_directory
  second_directory: /home/user/another_directory

steps:
- name: List content of all directories
  exec:
  - ls bld:env:first_directory
  - ls $second_directory
version 2
name: Example pipeline with environment variables 1
runs_on: machine
version: 2

environment:
  first_directory: /home/user/target_directory
  second_directory: /home/user/another_directory

jobs:
  main:
  - name: List content of all directories
    exec:
    - ls ${{first_directory}}
    - ls $second_directory
And specify a different value using the -e or --environment of the run subcommand
$ bld run -p example.yaml -e first_directory=some_path -e second_directory=some_other_path
Note: The environment variable fields support expressions so a variable, an environment variable or a keyword can be used as a environment variable's default value.
Keywords
Supported for pipeline versions:
version 1,version 2
This isn't related to any field available to the pipeline syntax but more regarding the expressions. Bld has some built in keywords for specific information about a run, those are
Version 1
All of the below keywords are used with the bld:run: prefix.
- root_dir : This is the path to the .bld directory of the project.
- id: This is the unique uuid for the pipeline run.
- start_time: The start time of the pipeline run.
version: 1
runs_on: machine

steps:
    - exec:
      - echo bld:run:root_dir
      - echo bld:run:id
      - echo bld:run:start_time
Version 2
All of the below keywords are used inside the ${{ ... }} syntax.
- bld_root_dir: This is the path to the .bld directory of the project.
- bld_project_dir: This is the path to the current project directory, that is the parent of the .bld directory.
- bld_run_id: This is the unique uuid for the pipeline run.
- bld_start_time: The start time of the pipeline run.
version: 2
runs_on: machine

jobs:
    main:
      - echo ${{bld_root_dir}}
      - echo ${{bld_project_dir}}
      - echo ${{bld_run_id}}
      - echo ${{bld_start_time}}
Artifacts
Supported in pipeline versions:
version 1,version 2
This section can be used to send or fetch files to or from a container created by a run. For example let say we create a pipeline that will create a file in an ubuntu container and then fetch it on the current machine.
name: Example pipeline for artifacts
runs_on: ubuntu
version: 2

artifacts:
- method: get
  from: /sample_file
  to: /home/user/some_directory
  after: main

jobs:
  main:
  - echo 'hello world' > sample_file
The artifacts section supports methods get to retrieve files and push to send files to the container. The after field can specify a step instead of a job or it can be omitted in order for the operation to execute before any job or step.
name: Example pipeline for artifacts
runs_on: ubuntu
version: 2

artifacts:
- method: get
  from: /sample_file
  to: /home/user/some_directory
  after: Echo step

jobs:
  main:
  - name: Echo step
    exec:
    - echo 'hello world' > sample_file
  - name: Another echo step
    exec:
    - echo 'hello again'
Note: The artifacts section support expressions so a variable, an environment variable or a keyword can be used in the
from,toandafterfields.
External
Supported in pipeline versions:
version 1,version 2
The external section can used to declare information about another pipeline (either local or on a remote server) and be invoked by jobs.
Lets see all 3 ways that an external pipeline can be called. The first way is to simply call it in the exec part of a step.
runs_on: ubuntu
version: 2

jobs:
  main:
  - ext: child.yaml
The second way is to define a new entry to the external section for the pipeline, where values for variables and environment variables can be defined.
runs_on: ubuntu
version: 2

external:
- pipeline: child.yaml
  variables:
    some-variable: an example value

jobs:
  main:
  - ext: child.yaml
The third way is to use a name in the external entries which can even have the same pipelines but with different declarations.
runs_on: ubuntu
version: 2

variables:
  some-variable: an examples value

external:
- name: Call child.yaml with a variable
  pipeline: child.yaml
  variables:
    some-variable: ${{some-variable}}

- name: Call child.yaml on a server
  pipeline: child.yaml
  server: demo_server
  variables:
    some-variable: an example value

- name: Call child-2.yaml on a server
  pipeline: child-2.yaml
  server: demo_server

jobs:
  main:
  - ext: Call child.yaml with a variable
  - ext: Call child.yaml on a server
  - ext: Call child-2.yaml on a server
As seen above in the external section you can define a server in order to invoke the child pipeline to a Bld server. For example let see the below example that invokes a pipeline to a server called demo.
pipeline: Parent pipeline
runs_on: ubuntu
version: 2

external:
- pipeline: child.yaml
  server: demo

jobs:
  main:
  - name: Do execute child
    exec:
    - ext: child.yaml
Additionally as you will already have figured out you can pass both variables and environment variables to the target pipeline. See the below example for configuring them.
external:
- name: Execute child pipeline
  pipeline: child.yaml
  variables:
  - variable1: hello
  - variable2: ${{some_variable}}
  environment:
  - env1: hello world
Note: The external section support expressions so a variable, an environment variable or a keyword can be used in the
name,server,pipeline,variablesandenvironmentfields.
Jobs and steps
Jobs are supported in pipeline versions:
version 2
Steps are supported in pipeline versions:version 1,version 2
The jobs section describes a set of parallel commands to be executed or external pipelines to be invoked. All jobs contain a number of steps with steps having mutliple representation for the level of complexity they want to achieve.
In version 1 of the pipeline syntax only steps could be defined and run sequentially, while in version 2 jobs were introduced for parallel execution.
Let's take a look at an example where a version 1 pipeline will execute some command in sequential order:
name: Example pipeline for multiple steps
runs_on: machine
version: 1

steps:
  - exec:
    - ls ./some_directory
    - ls ./some_other_directory
    - ls ./yet_another_directory

  - exec:
    - echo 'hello world' > sample_file

  - exec:
    - curl ifconfig.me
The same example for a version 2 pipeline that executes the command but in parallel:
name: Example pipeline
runs_on: machine
version: 2

jobs:
  list_content_of_directories:
  - ls ./some_directory
  - ls ./some_other_directory
  - ls ./yet_another_directory

  create_sample_file:
  - echo 'hello world' > sample_file

  curl_ip_address:
  - curl ifconfig.me
If you've read the previous section for the external pipelines, you will already know that by using the ext: key on a step, the action taken is to invoke that pipeline, based on the external configuration (if no configuration is present the pipeline is simply run locally).
version 1
name: Example pipeline
runs_on: machine
version: 1

steps:
  - exec:
    - ext: example-pipeline-1.yaml
    - ext: example-pipeline-2.yaml
    - echo 'hello'
version 2
name: Example pipeline
runs_on: machine
version: 2

jobs:
  main:
  - ext: example-pipeline-1.yaml
  - ext: example-pipeline-2.yaml
  - echo 'hello'
if a step requires more refined operations such as executing many actions you can define a name and an exec list.
version 1
name: Example pipeline for multiple steps
runs_on: machine
version: 1

steps:
  - name: List the content of directories
    exec:
    - ls ./some_directory
    - ls ./some_other_directory
    - ls ./yet_another_directory

  - name: Create a sample file
    exec:
    - echo 'hello world' > sample_file

  - name: Curl IP address
    exec:
    - curl ifconfig.me
version 2
name: Example pipeline for multiple steps
runs_on: machine
version: 2

jobs:
  main:
  - name: List the content of directories
    exec:
    - ls ./some_directory
    - ls ./some_other_directory
    - ls ./yet_another_directory

  - name: Create a sample file
    exec:
    - echo 'hello world' > sample_file

  - name: Curl IP address
    exec:
    - curl ifconfig.me
A named step can also have ext entries as shown below
version 1
name: Example pipeline for calling another pipeline
runs_on: machine
version: 1

steps:
  - name: Call another pipeline and list a directory
    exec:
    - ext: example-1.yaml
    - ls ./some_directory
version 2
name: Example pipeline for calling another pipeline
runs_on: machine
version: 2

jobs:
  main:
  - name: Call another pipeline and list a directory
    exec:
    - ext: example-1.yaml
    - ls ./some_directory
You can use the working_dir option to change the target directory for a specific step as show below
version 1
name: Example pipeline
runs_on: ubuntu
version: 1

steps:
  - name: First step
    working_dir: /some/working/directory
    exec:
    - ls ./subdirectory
    - rm ./subdirectory/file

  - name: Second step
    working_dir: /another/working/directory
    exec:
    - ls ./some-other-dir/
version 2
name: Example pipeline
runs_on: ubuntu
version: 2

jobs:
  main:
  - name: First step
    working_dir: /some/working/directory
    exec:
    - ls ./subdirectory
    - rm ./subdirectory/file

  - name: Second step
    working_dir: /another/working/directory
    exec:
    - ls ./some-other-dir/
Remember that a named step can be used from an artifacts section to transfer data from or to the used platform.
Note: The jobs section support expressions so a variable, an environment variable or a keyword can be used in all forms of a step and it's fields.
Validation
Supported in pipeline versions:
version 1,version 2
Pipelines are run under a set of validation rules that target to help identify issues before the pipeline actually runs. This is the first part of a local run, but validation rules will be executed when a pipeline is pushed in a bld server instance and manually by running the check subcommand.
The validation rules differ between pipeline versions since the syntax could change drastically, since the validation are both structural for the yaml file as well as contextual based on what features are used. Below all validation rules for each version will be presented.
Version 1
external->pipeline
- Checks if the pipeline file path exists.
external->server
- Checks if the server name used is found in the
.bld/config.yamlfile.
steps->exec->ext
- Checks if the external key is found either as a local pipeline or a defined external declaration inside the pipeline itself.
artifacts->after`
- Checks if the step name in the after key is found in the pipeline's steps.
Version 2
runs_on
- Checks for use of variables, environment variables or keywords and if their name is defined in the pipeline.
runs_on->name
- Checks for use of variables, environment variables or keywords and if their name is defined in the pipeline.
runs_on->tag
- Checks for use of variables, environment variables or keywords and if their name is defined in the pipeline.
runs_on->dockerfile
- Checks for use of variables, environment variables or keywords and if their name is defined in the pipeline.
- Checks if the dockerfile path is valid when no variables or keywords are used.
runs_on->image
- Checks for use of variables, environment variables or keywords and if their name is defined in the pipeline.
runs_on->docker_url
- Checks for use of variables, environment variables or keywords and if their name is defined in the pipeline.
- Checks if a single url has been defined in the config file or if the name matches one of the multiple urls defined (when no variables or keywords are used).
runs_on->registry
- Checks for use of variables, environment variables or keywords and if their name is defined in the pipeline.
- Checks when a key is provided if that registry key exists in the config file.
runs_on->ssh_config
- Checks for use of variables, environment variables or keywords and if their name is defined in the pipeline.
- If no variables or keywords found then the name is checked in the
.bld/config.yamlfile in order to find if it has been defined.
runs_on->host
- Checks for use of variables, environment variables or keywords and if their name is defined in the pipeline.
runs_on->port
- Checks for use of variables, environment variables or keywords and if their name is defined in the pipeline.
runs_on->user
- Checks for use of variables, environment variables or keywords and if their name is defined in the pipeline.
runs_on->userauth->public_key
- Checks for use of variables, environment variables or keywords and if their name is defined in the pipeline.
- If no variables or keywords are used then the path is checked if it exists.
runs_on->userauth->private_key
- Checks for use of variables, environment variables or keywords and if their name is defined in the pipeline.
- If no variables or keywords are used then the path is checked if it exists.
runs_on->userauth->password
- Checks for use of variables, environment variables or keywords and if their name is defined in the pipeline.
cron
- Checks if the defined cron syntax is a valid schedule.
variables
- Checks all defined variables if the name is a built in keyword.
- Checks for use of variables, environment variables or keywords and if their name is defined in the pipeline.
environment
- Checks all defined variables if the name is a built in keyword.
- Checks for use of variables, environment variables or keywords and if their name is defined in the pipeline.
external->name
- Checks for use of variables, environment variables or keywords and if their name is defined in the pipeline.
external->pipeline
- Checks for use of variables, environment variables or keywords and if their name is defined in the pipeline.
- Checks if the pipeline file path exists when no variables or keywords are used.
external->server
- Checks for use of variables, environment variables or keywords and if their name is defined in the pipeline.
- Checks if the server name used is found in the
.bld/config.yamlfile when no variables or keywords are used when no variables or keywords are used.
external->variables
- Checks all defined variables if the name is a built in keyword.
- Checks for use of variables, environment variables or keywords and if their name is defined in the pipeline.
external->environment
- Checks all defined variables if the name is a built in keyword.
- Checks for use of variables, environment variables or keywords and if their name is defined in the pipeline.
artifacts->from
- Checks for use of variables, environment variables or keywords and if their name is defined in the pipeline.
artifacts->to
- Checks for use of variables, environment variables or keywords and if their name is defined in the pipeline.
artifacts->after
- Checks for use of variables, environment variables or keywords and if their name is defined in the pipeline.
- Checks if the step name in the after key is found in the pipeline's jobs or steps when no variables or keywords are used.
steps->exec->ext
- Checks for use of variables, environment variables or keywords and if their name is defined in the pipeline.
- Checks if the external key is found either as a local pipeline or a defined external declaration inside the pipeline itself.
steps->exec->working_dir
- Checks for use of variables, environment variables or keywords and if their name is defined in the pipeline.
Server mode
Bld can run in server mode in order to run, push, pull, list pipelines and more. This section of the book goes into more detail on some of features of a server.
How to start a server
Bld has configuration options for running in server mode. In a brand new project you can run
$ bld init -s
To initialize a .bld directory with a config.yaml that has some default values. Additionally, you can use the config sub-command in order to print the entire configuration of your project.
Once the project is initialized, you can use the server sub-command to start bld in server mode.
$ bld server
$ bld server --verbose # run with verbosity and see debug logs
Running a server pipeline
For this section let's say that you have deployed a bld server on a VM or container and want to run a pipeline on it. To do this you need first to target that server in your project's config.yaml file
local:
  docker_url: tcp://127.0.0.1:2376

remote:
- server: example_server
  host: 127.0.0.1
  port: 6080
In the above example, we have the example_server in our remote config section, which is available at the defined host and port.
A Bld server generates and connect to a sqlite database in order to keep track of pipelines, runs and containers. This means that in order to run a pipeline on it, you need first to register it. To do this you can use the push sub-command. For example let's say that in a local project you have the sample.yaml pipeline. Execute the below to register it to the example_server
$ bld push -s example_server -p sample.yaml
Once pushed you can use helper sub-commands like
listto see all registered pipelinescatto see the content of a pipeline on the serverpullto download a pipeline from a serverrmto remove a pipeline from a server
For more details on each action, see the Command line interface page.
Finnaly, to run the pipeline use the run sub-command and specify the target server
$ bld run -s example_server -p sample.yaml
This will start the execution on the server side and keep a web socket connection in order to see in real time the output of the pipeline. Use the --detach flag to detach from the run. This will send a request to start the run and return immediately.
Database
IMPORTANT! prior to the v0.3 release bld used the
dieselcrate for connecting to ansqlitedatabase but from v0.3 onwards the project migrated toSeaOrmand now supportspostgres,mysqlas well assqliteas a database. Due to this change projects running a server in prior versions will have issues with migrations since this was a breaking change.
Bld supports connecting to a postgres, mysql or sqlite databases. To do so you need to provide an appropriate connection url in the .bld/config.yaml file. Below there are examples on how you can configure the url for all 3 backends.
Postgres
local:
    server:
        db: postgres://some_user:some_password@127.0.0.1/bld-server
And an example using an explicit port:
local:
    server:
        db: postgres://some_user:some_password@127.0.0.1:8888/bld-server
Mysql
local:
    server:
        db: mysql://some_user:some_password@127.0.0.1/bld-server
And an example using an explicit port:
local:
    server:
        db: mysql://some_user:some_password@127.0.0.1:8888/bld-server
Sqlite
local:
    server:
        db: sqlite:///some/path/to/.bld/db/bld-server.db
Authorization
Server mode does not have it's own authorization method but it uses external services. The only current method is using an existing oidc provider with an example below.
Configuration of server to validate user using google's oidc
The below example assumes that google authorization has been setup.
local:
  server:
    host: localhost
    port: 6080
    auth:
      method: oidc
      issuer_url: https://accounts.google.com
      redirect_url: http://localhost:6080/auth/redirect
      client_id: __the client id__
      client_secret: __the client secret__
      scopes: ["openid", "profile", "email"]
      user_property: name
  docker_url: tcp://127.0.0.1:2376
Note: The
user_propertyfield will be used as the identification name for the user for various logs in the server such as run history etc. The only available values are name or email and these are retrieved from the user info url discovered from the oidc provider.
Configuration of a server from a client's config.yaml
This will send a request to the provided validation url in order to fetch the user info.
local:
  docker_url: tcp://127.0.0.1:2376
remote:
- server: local_server
  host: localhost
  port: 6080
Login process
Use the login subcommand from the client this will connect to the server using a websocket that in turn will start the login operation.
$ bld login -s local_server
Once the login process starts, a url will be sent to the client and be opened automatically in a browser instance that will point to google's login page (If opening the brower fails, the url will be printed to stdout for the user to navigate m. Once the user is authenticated, the server will receive the tokens send them to the client throught the open web socket and then the login process will finish.
TLS
Server mode can be configured to use a certificate for https and wss connections. For most cases having the server behind a battle tested reverse proxy would be best.
To configure the certificate see the below example
local:
    server:
        host: 127.0.0.1
        port: 6080
        tls:
            cert_chain: /path/to/server/certificate
            private_key: /path/to/server/private-key
    supervisor:
        host: 127.0.0.1
        port: 7080
        tls:
            cert_chain: /path/to/supervisor/certificate
            private_key: /path/to/supervisor/private-key
The certificate should be of type PEM. Setting the tls option for the supervisor means that all communications between the server and the supervisor will be done using https and wss.
Connecting to a server with enabled tls, the local configuration should have the option of tls set to true, as seen in the below example.
local:
    docker_url: tcp://127.0.0.1:2376
remote:
    - server: local_srv
      host: 127.0.0.1
      port: 6080
      tls: true
SSH
One of the supported platforms is ssh which lets a pipeline execute all commands using a ssh connection. This part of the book isn't neccessarily only for bld servers but for local configurations as well.
In the .bld/config.yaml file you can define a ssh section that accepts keys/values for a number of ssh configurations, with an example shown below:
local:
    ssh:
        test_server_1:
            host: 192.168.122.3
            user: test_user
            userauth:
                type: keys
                public_key: /path/to/public_key
                private_key: /path/to/private_key
        test_server_2:
            host: 192.168.122.4
            user: test_user_2
            userauth:
                type: password
                password: some_password
        test_server_3:
            host: 192.168.122.5
            user: test_user_3
            userauth:
                type: agent
And use one of the above keys in a pipeline as shown below:
version: 2
runs_on:
    ssh_config: test_server_1

jobs:
    main:
    - echo hello world
The ssh configuration is similar to the one described in the Pipelines > Runs on section but for quick reference they will be presented here as well.
This configuration always expects the host, user and userauth fields with the port field being optional having a default value of port: 22 if not provided. Additionally the userauth field has 3 types of authentication that can be defined.
Password user authentication
The password authentication type for the ssh platform uses a password directly that is passed to the ssh connection when that is established. To define such user authentication you can use the below statement:
userauth:
    type: password
    password: the_user_password
Keys user authentication
The keys authentication type uses a private and a public key when establishing the ssh connection, and such a configuration can be done using the below statement:
userauth:
    type: keys
    public_key: /path/to/public_key
    private_key: /path/to/private_key
The private_key field is mandatory but the public_key is optional.
Agent user authentication
This type attemps to perform ssh agent authentication and can be configured using the below statement:
userauth:
    type: agent
User interface
A Bld server offer the ability to use a web interface to manage pipelines, see statistics and logs as well as manage reoccuring tasks. Some screenshots of the interface are shown below.
Login page
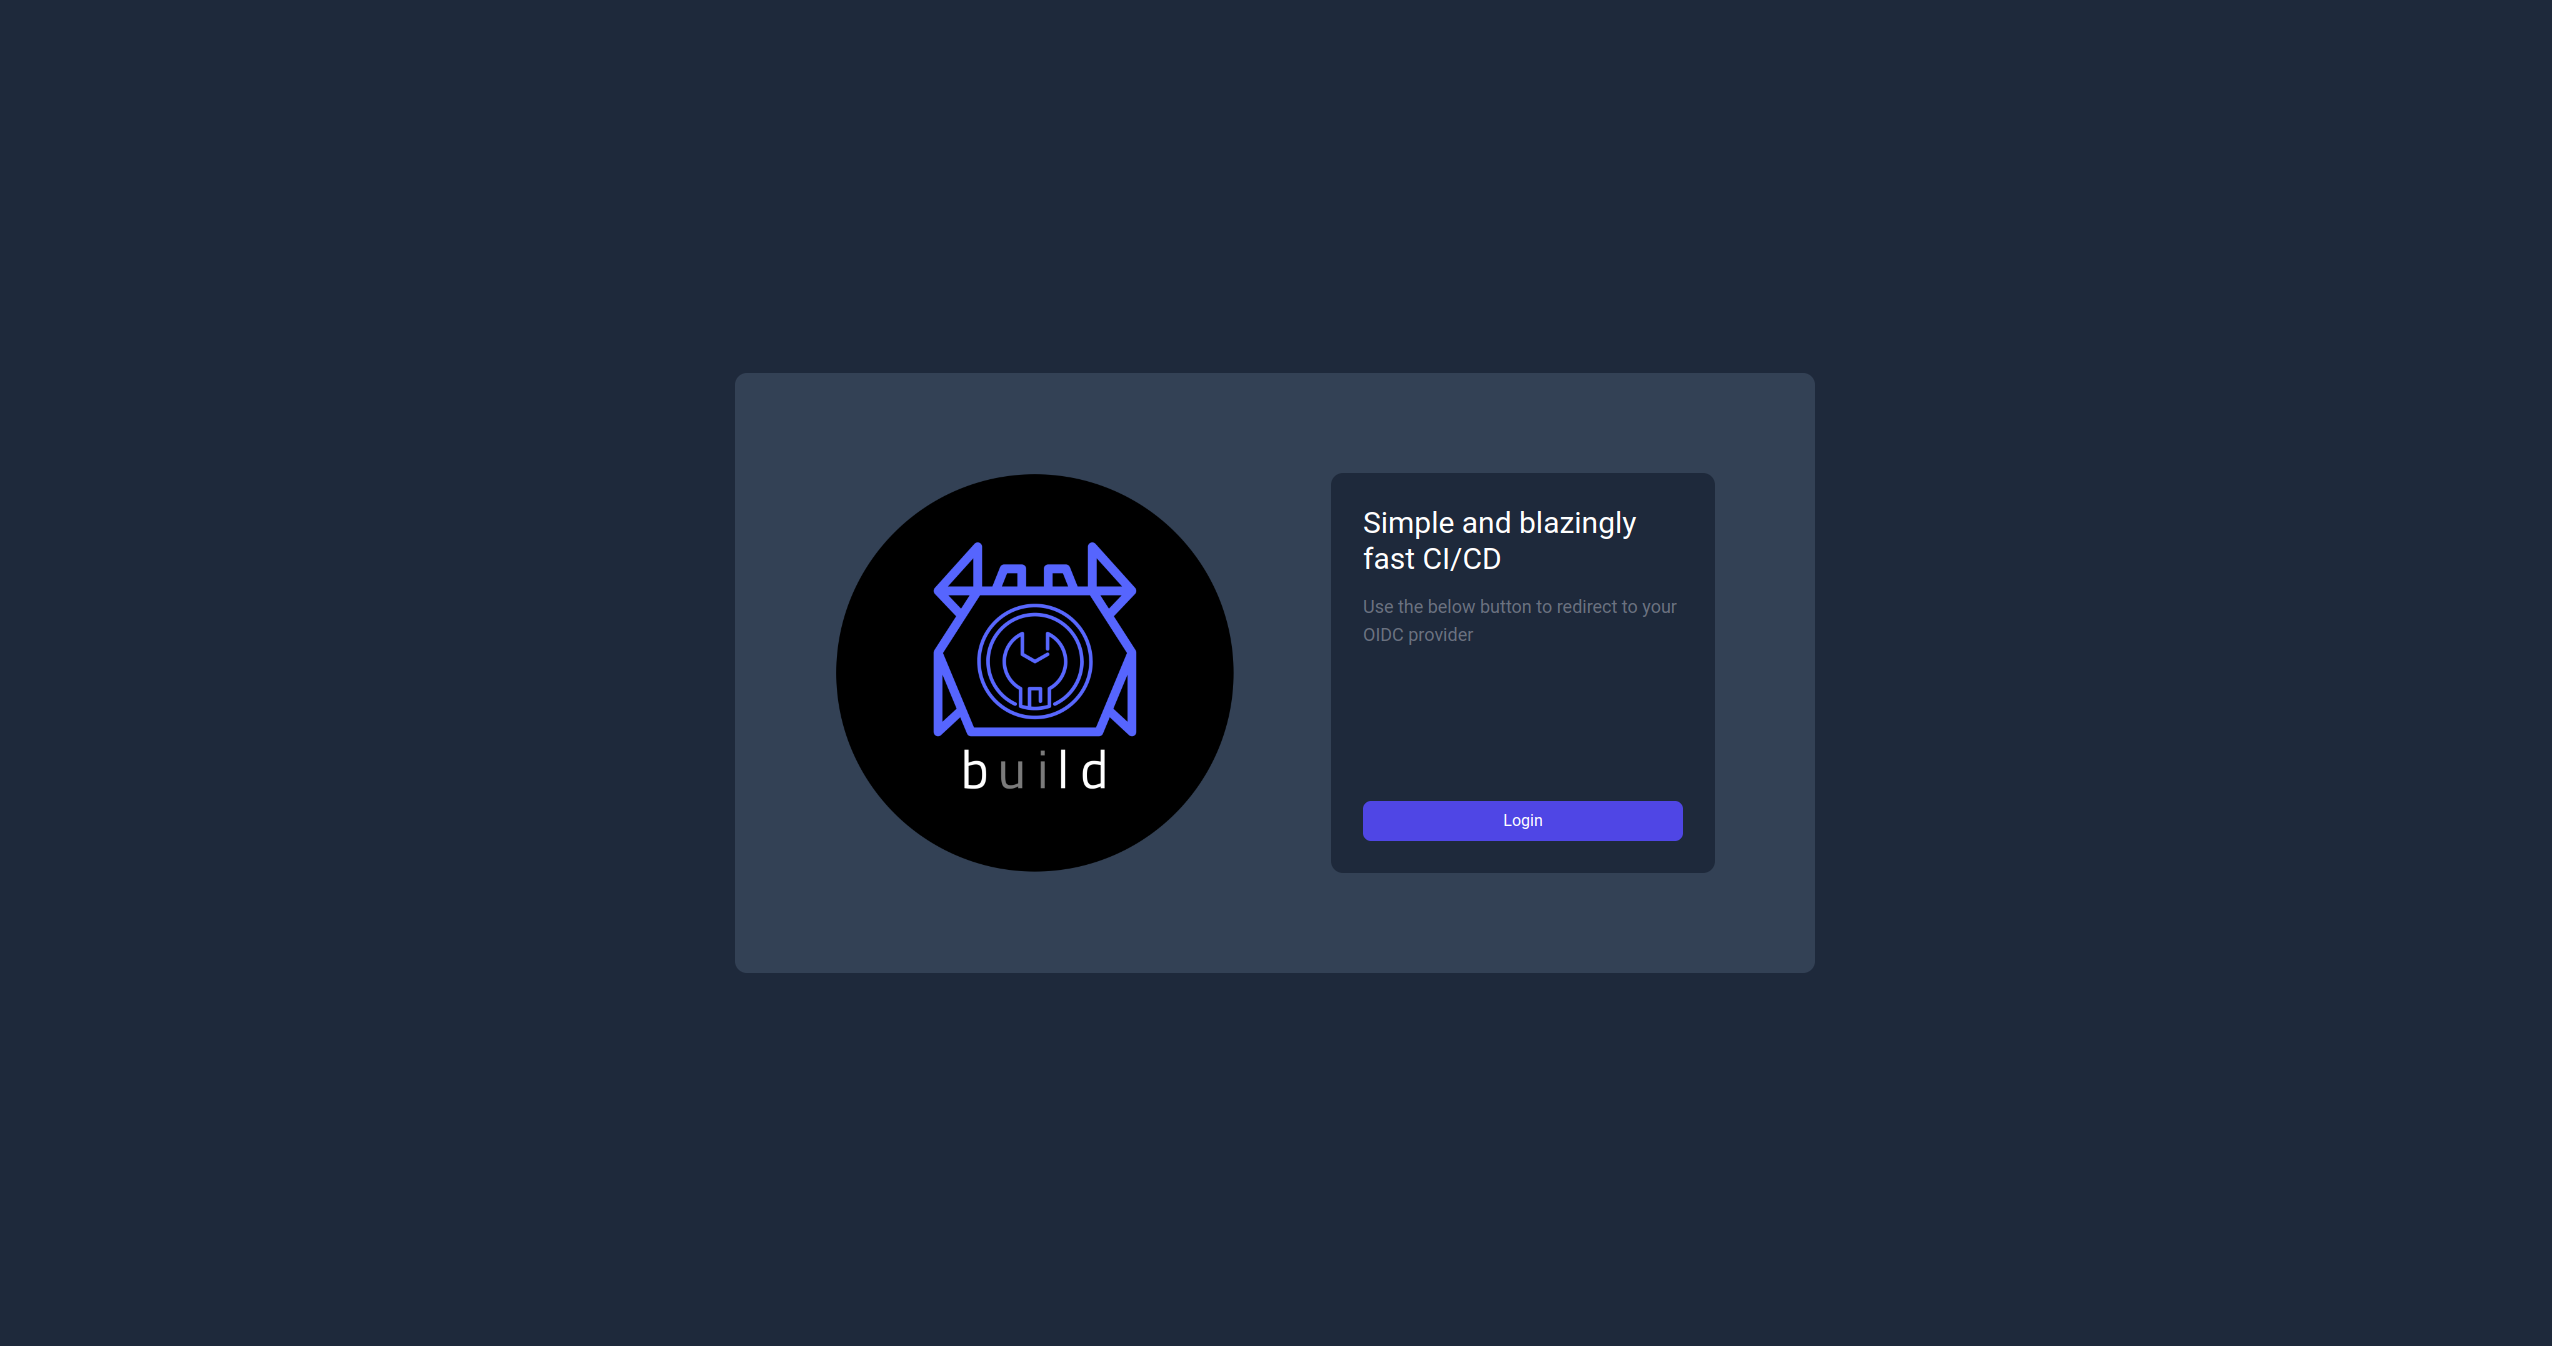
When a Bld server has been configured with an authentication method then the first page on should see when navigating to the server is the login page. The login page is a simple form with a redirect button that will initiate the authentication process. The use will be redirected to the configured authentication provider and once they have logged in they will be redirected to the home page of the Bld server UI.
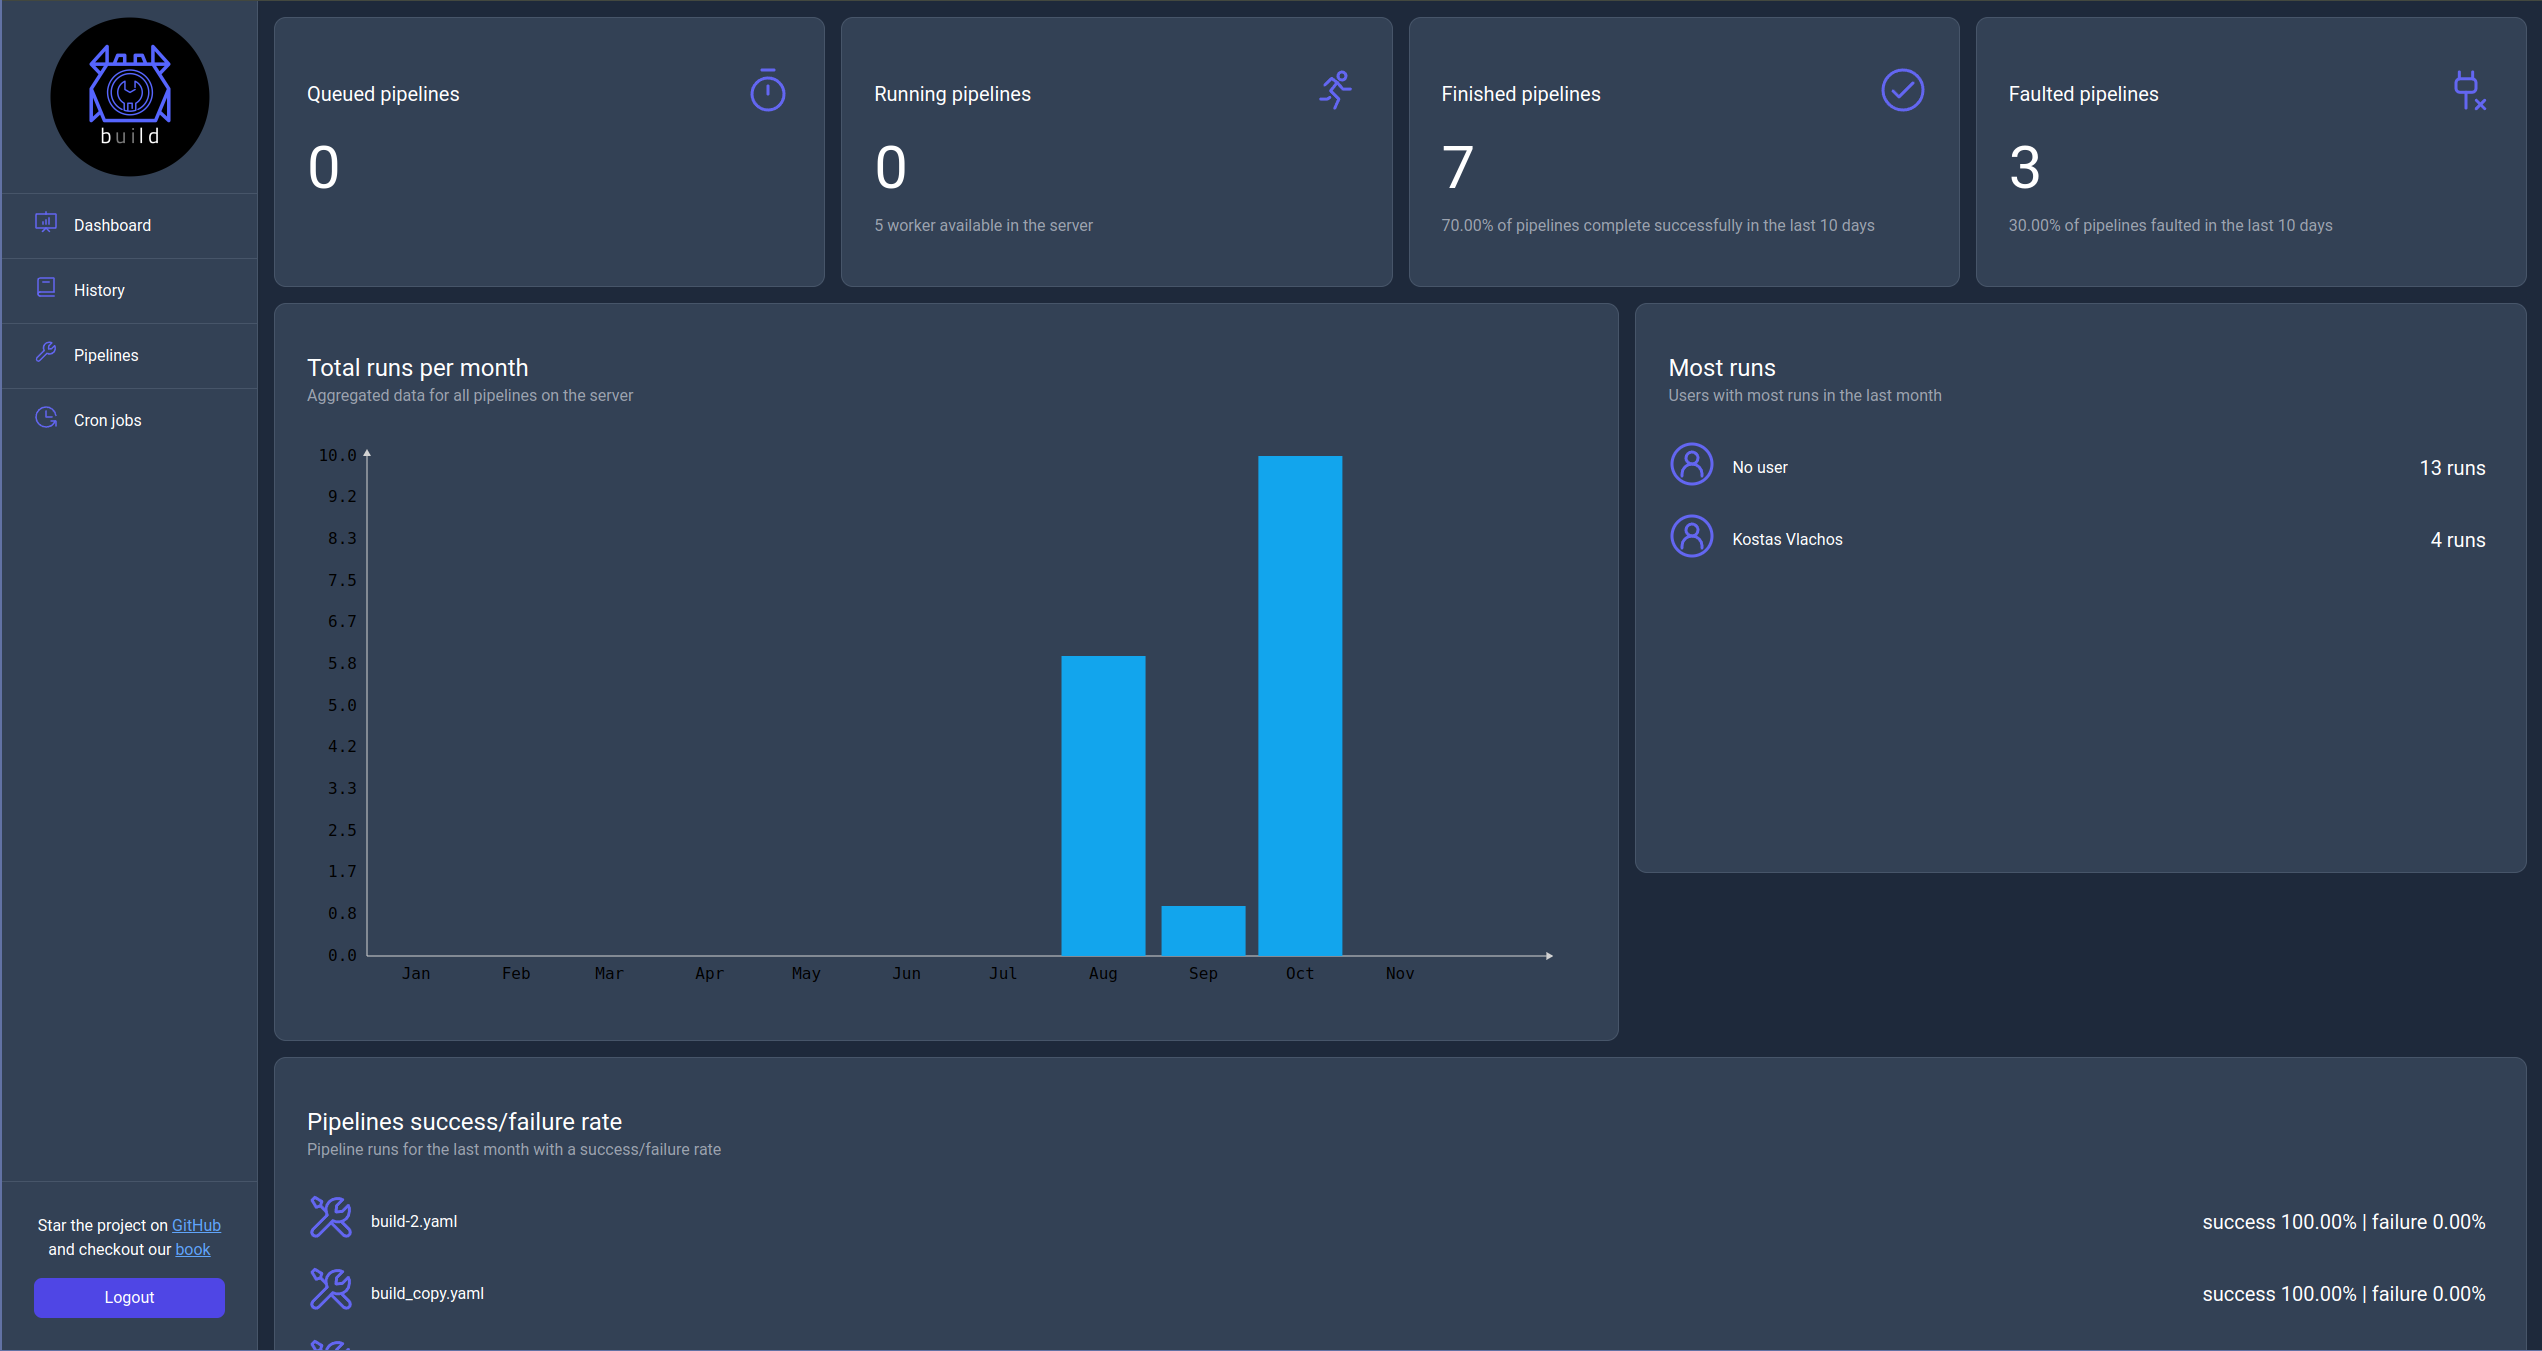
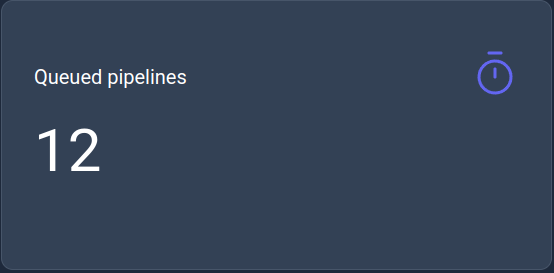
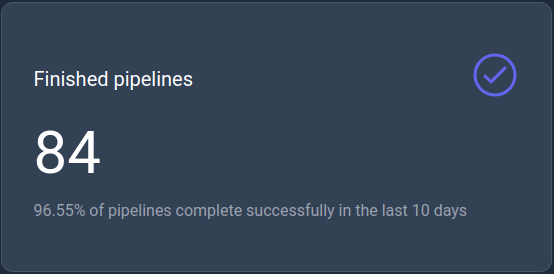
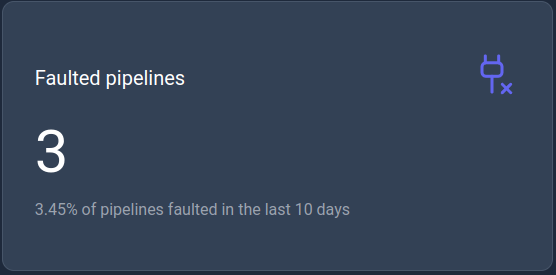
Dashboard page
The dashboard page (home page) will present to the user KPIs related to pipeline runs with each displaying a specific metrics for a specific time frame.
Queued pipelines
This KPI displays the current number of queued pipelines to run.
Running pipelines
This KPI displays the current number of running pipelines with the maximum capacity of worker configured for the server.

Finished pipelines
This KPI displays the number of successfully finished pipelines in the last 10 days.
Faulted pipelines
This KPI displays the number of faulted pipelines in the last 10 days.
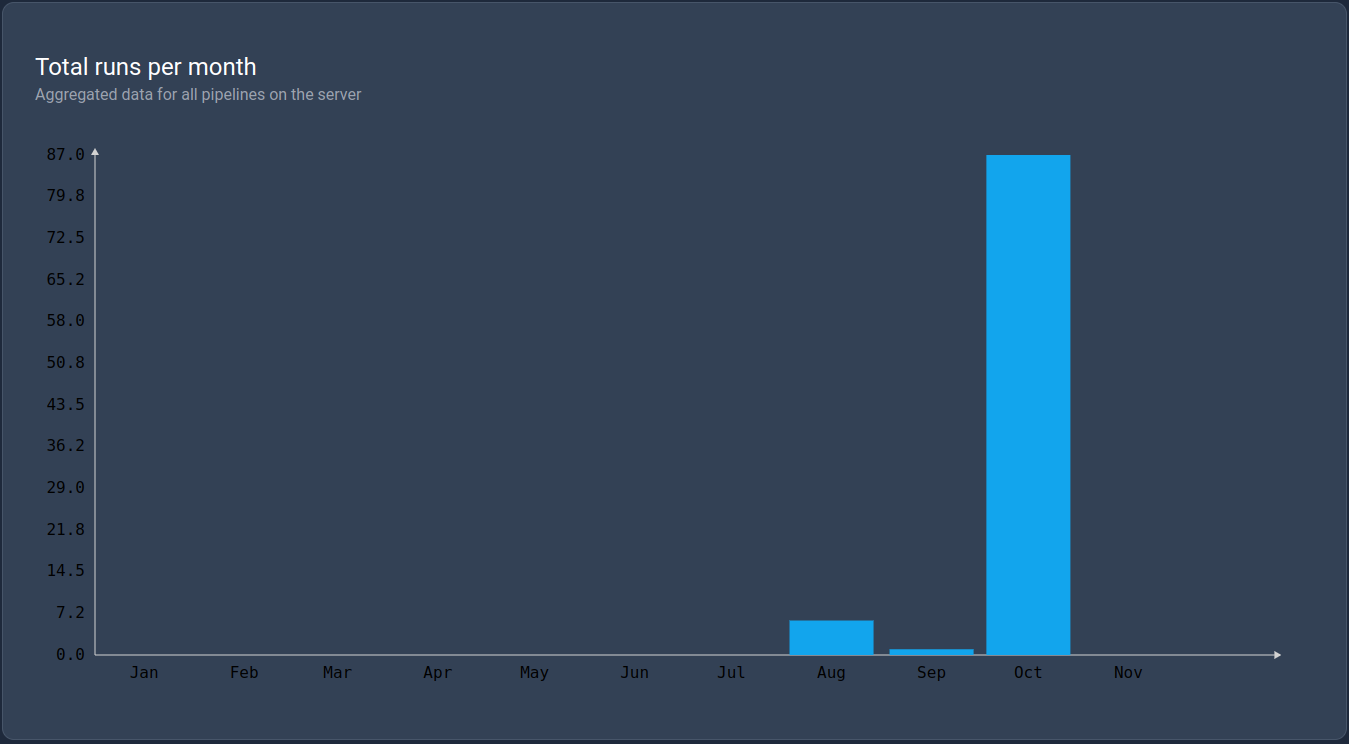
Total runs per month
This KPI is a bar chart that displays the total number of runs per month in the current year.
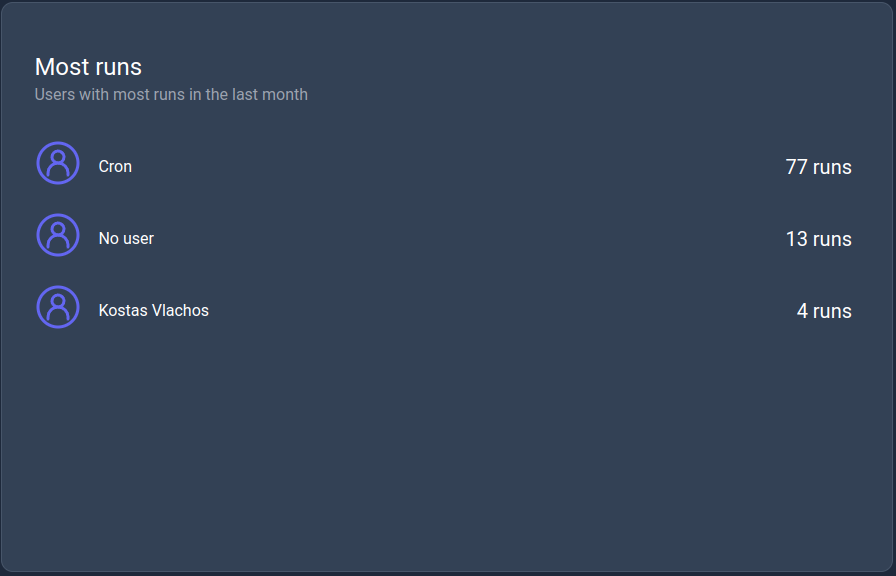
Most runs
This KPI displays the list of users with the most runs in the last month.
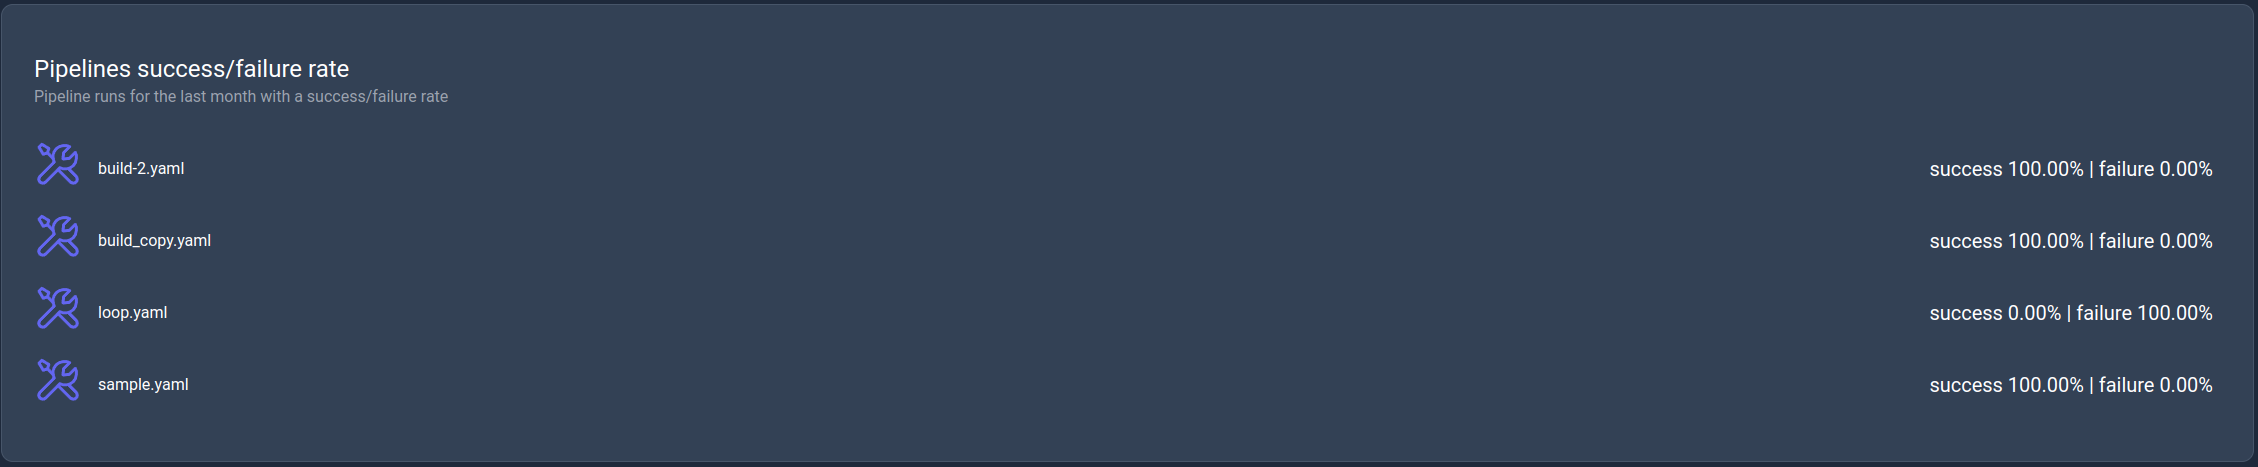
Success/Failure rate
This KPI displays the success/failure rate of the pipelines in the last month.
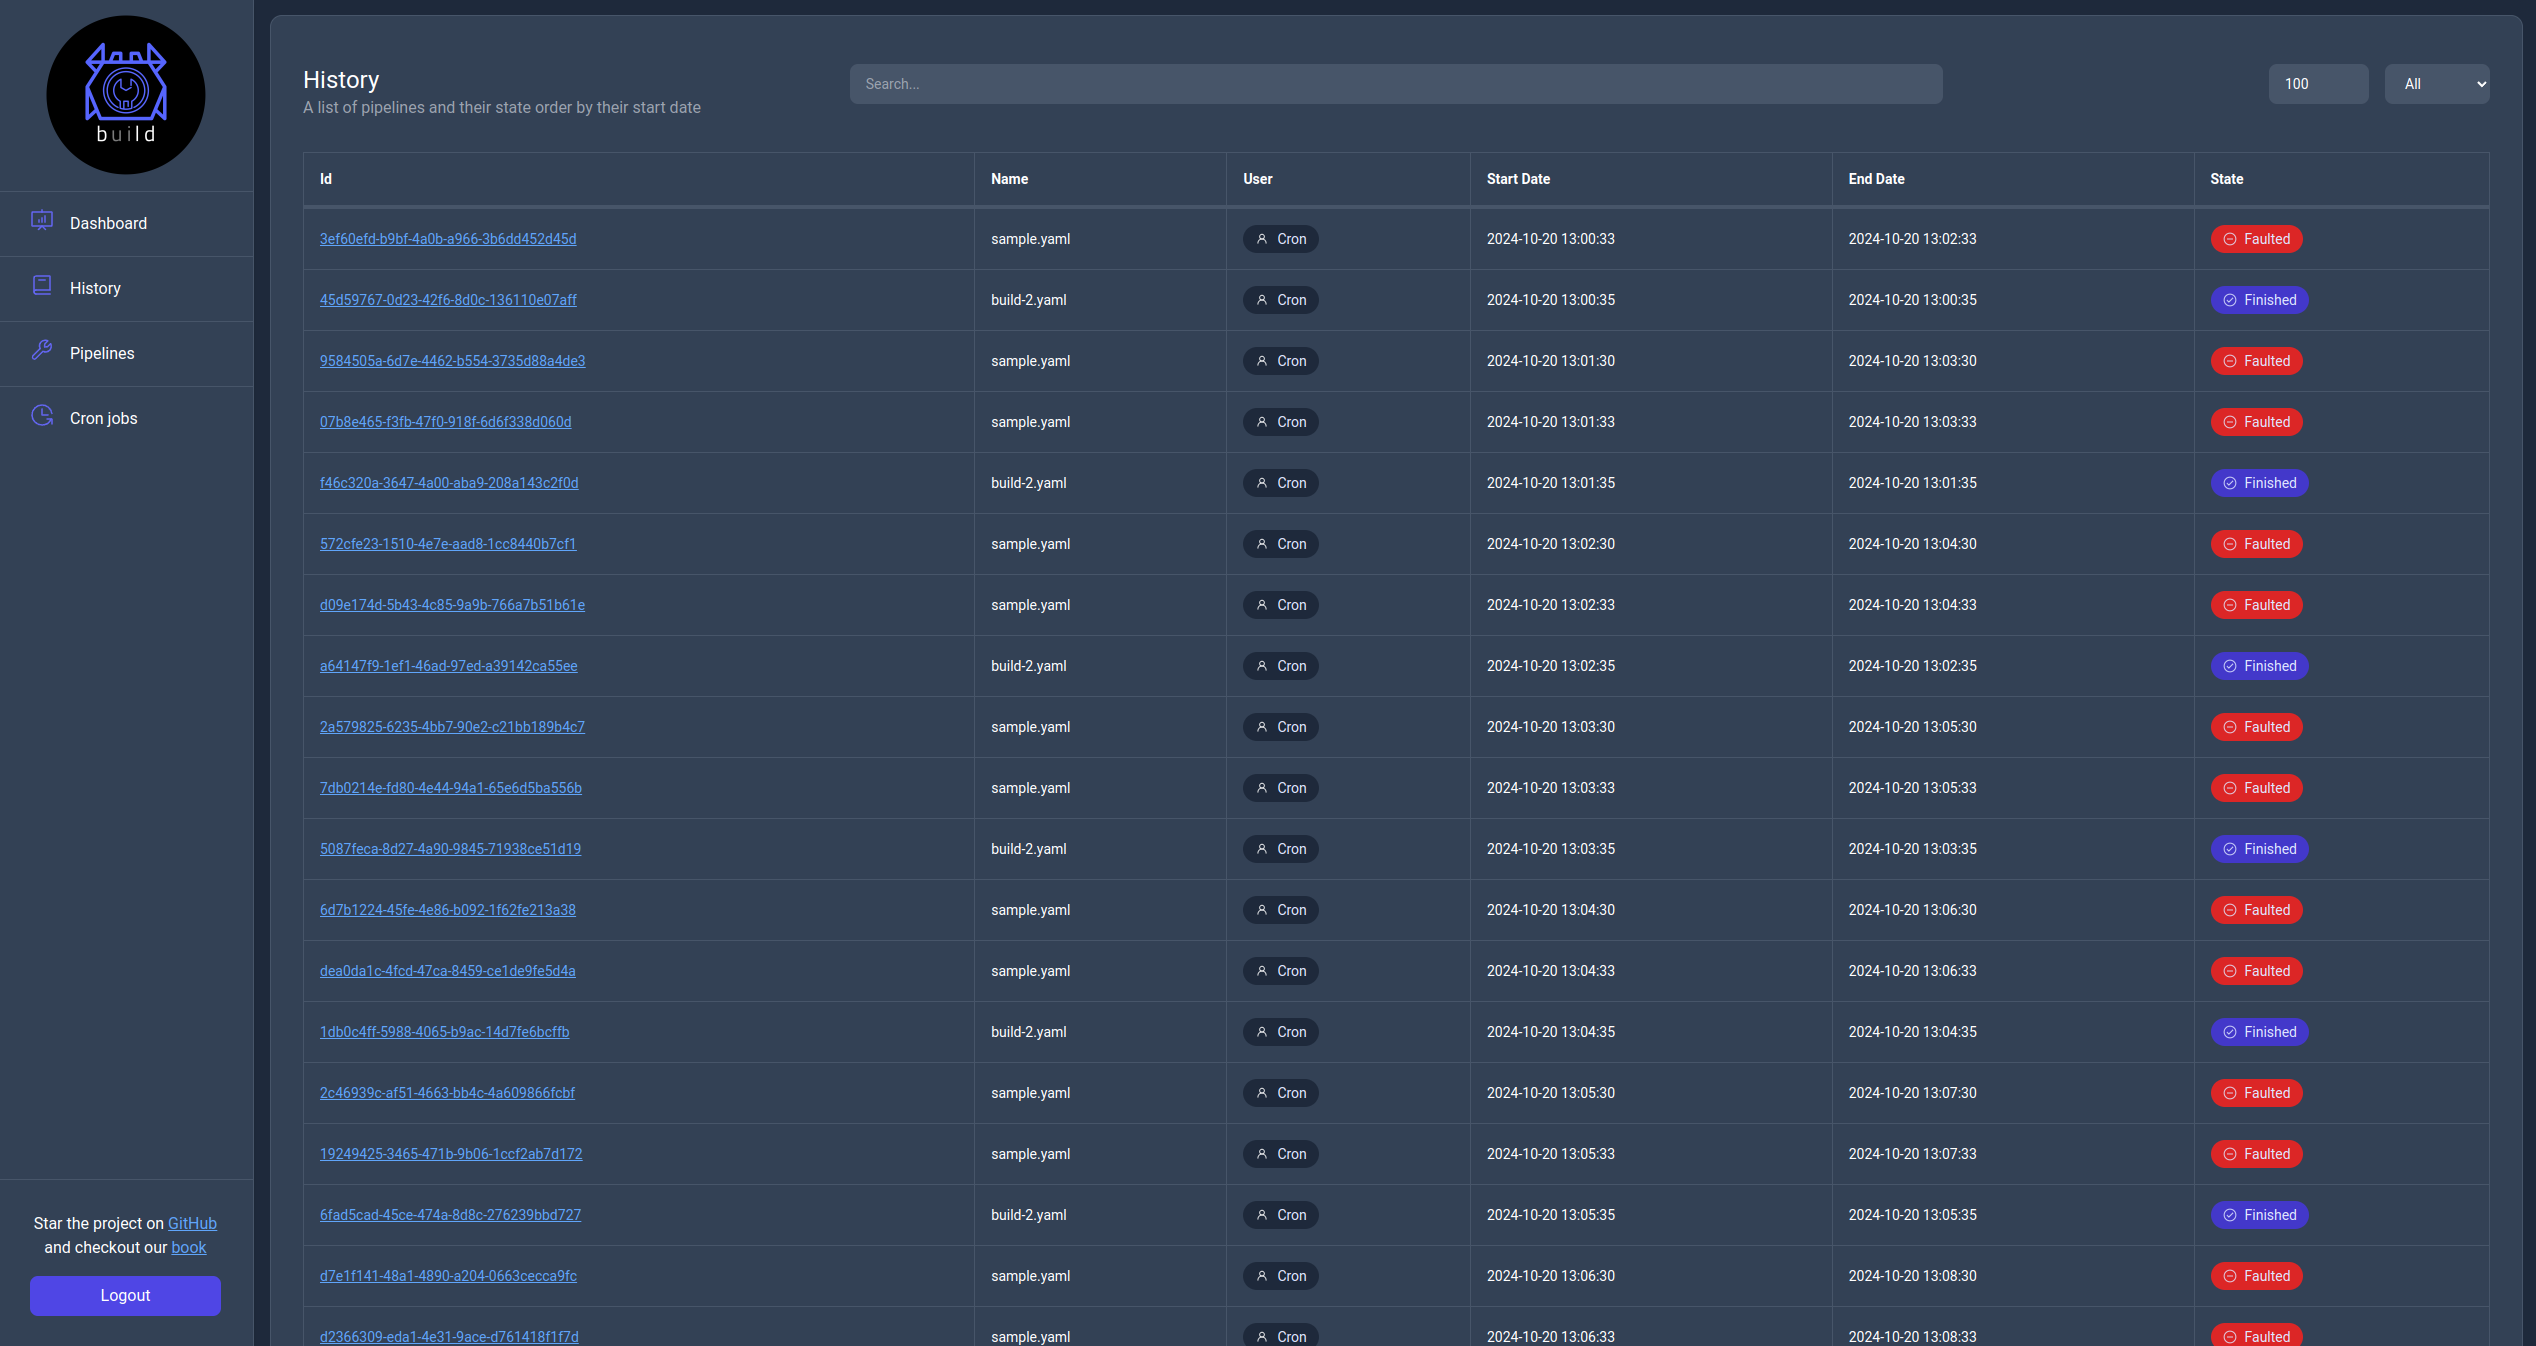
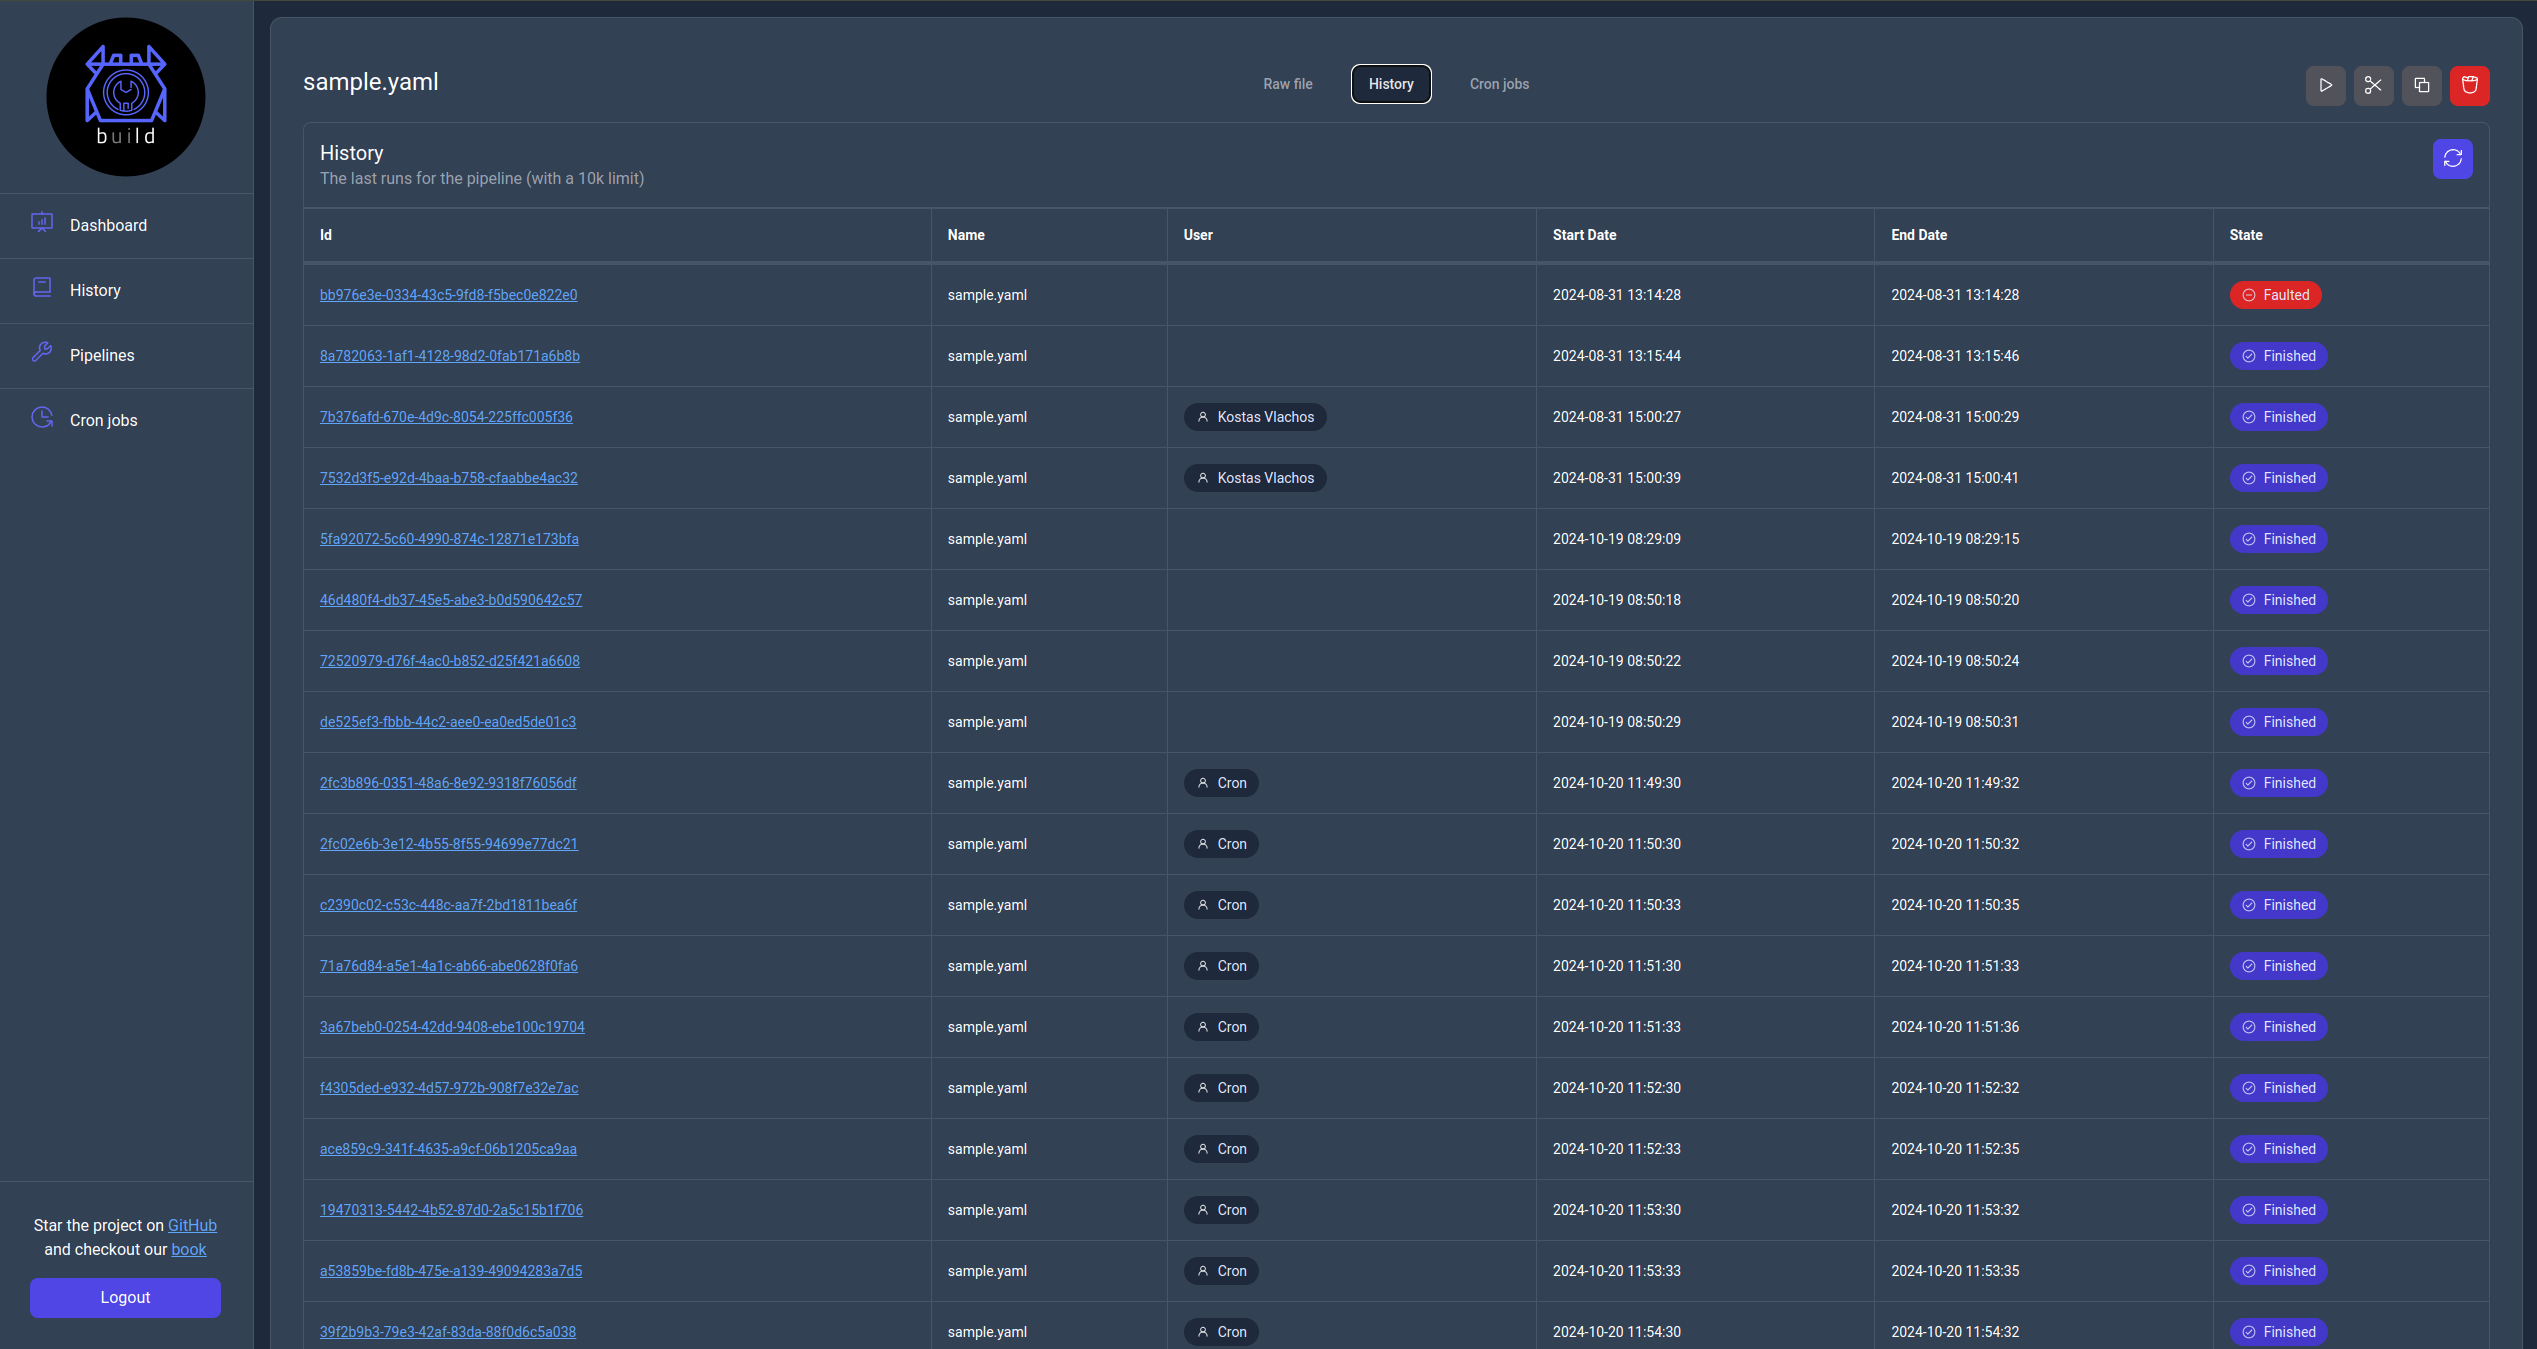
History page
This page contains information about all pipeline runs on the server with the ability to search and filter them. Additionally by clicking their Id url you can see the actual logs for each run.
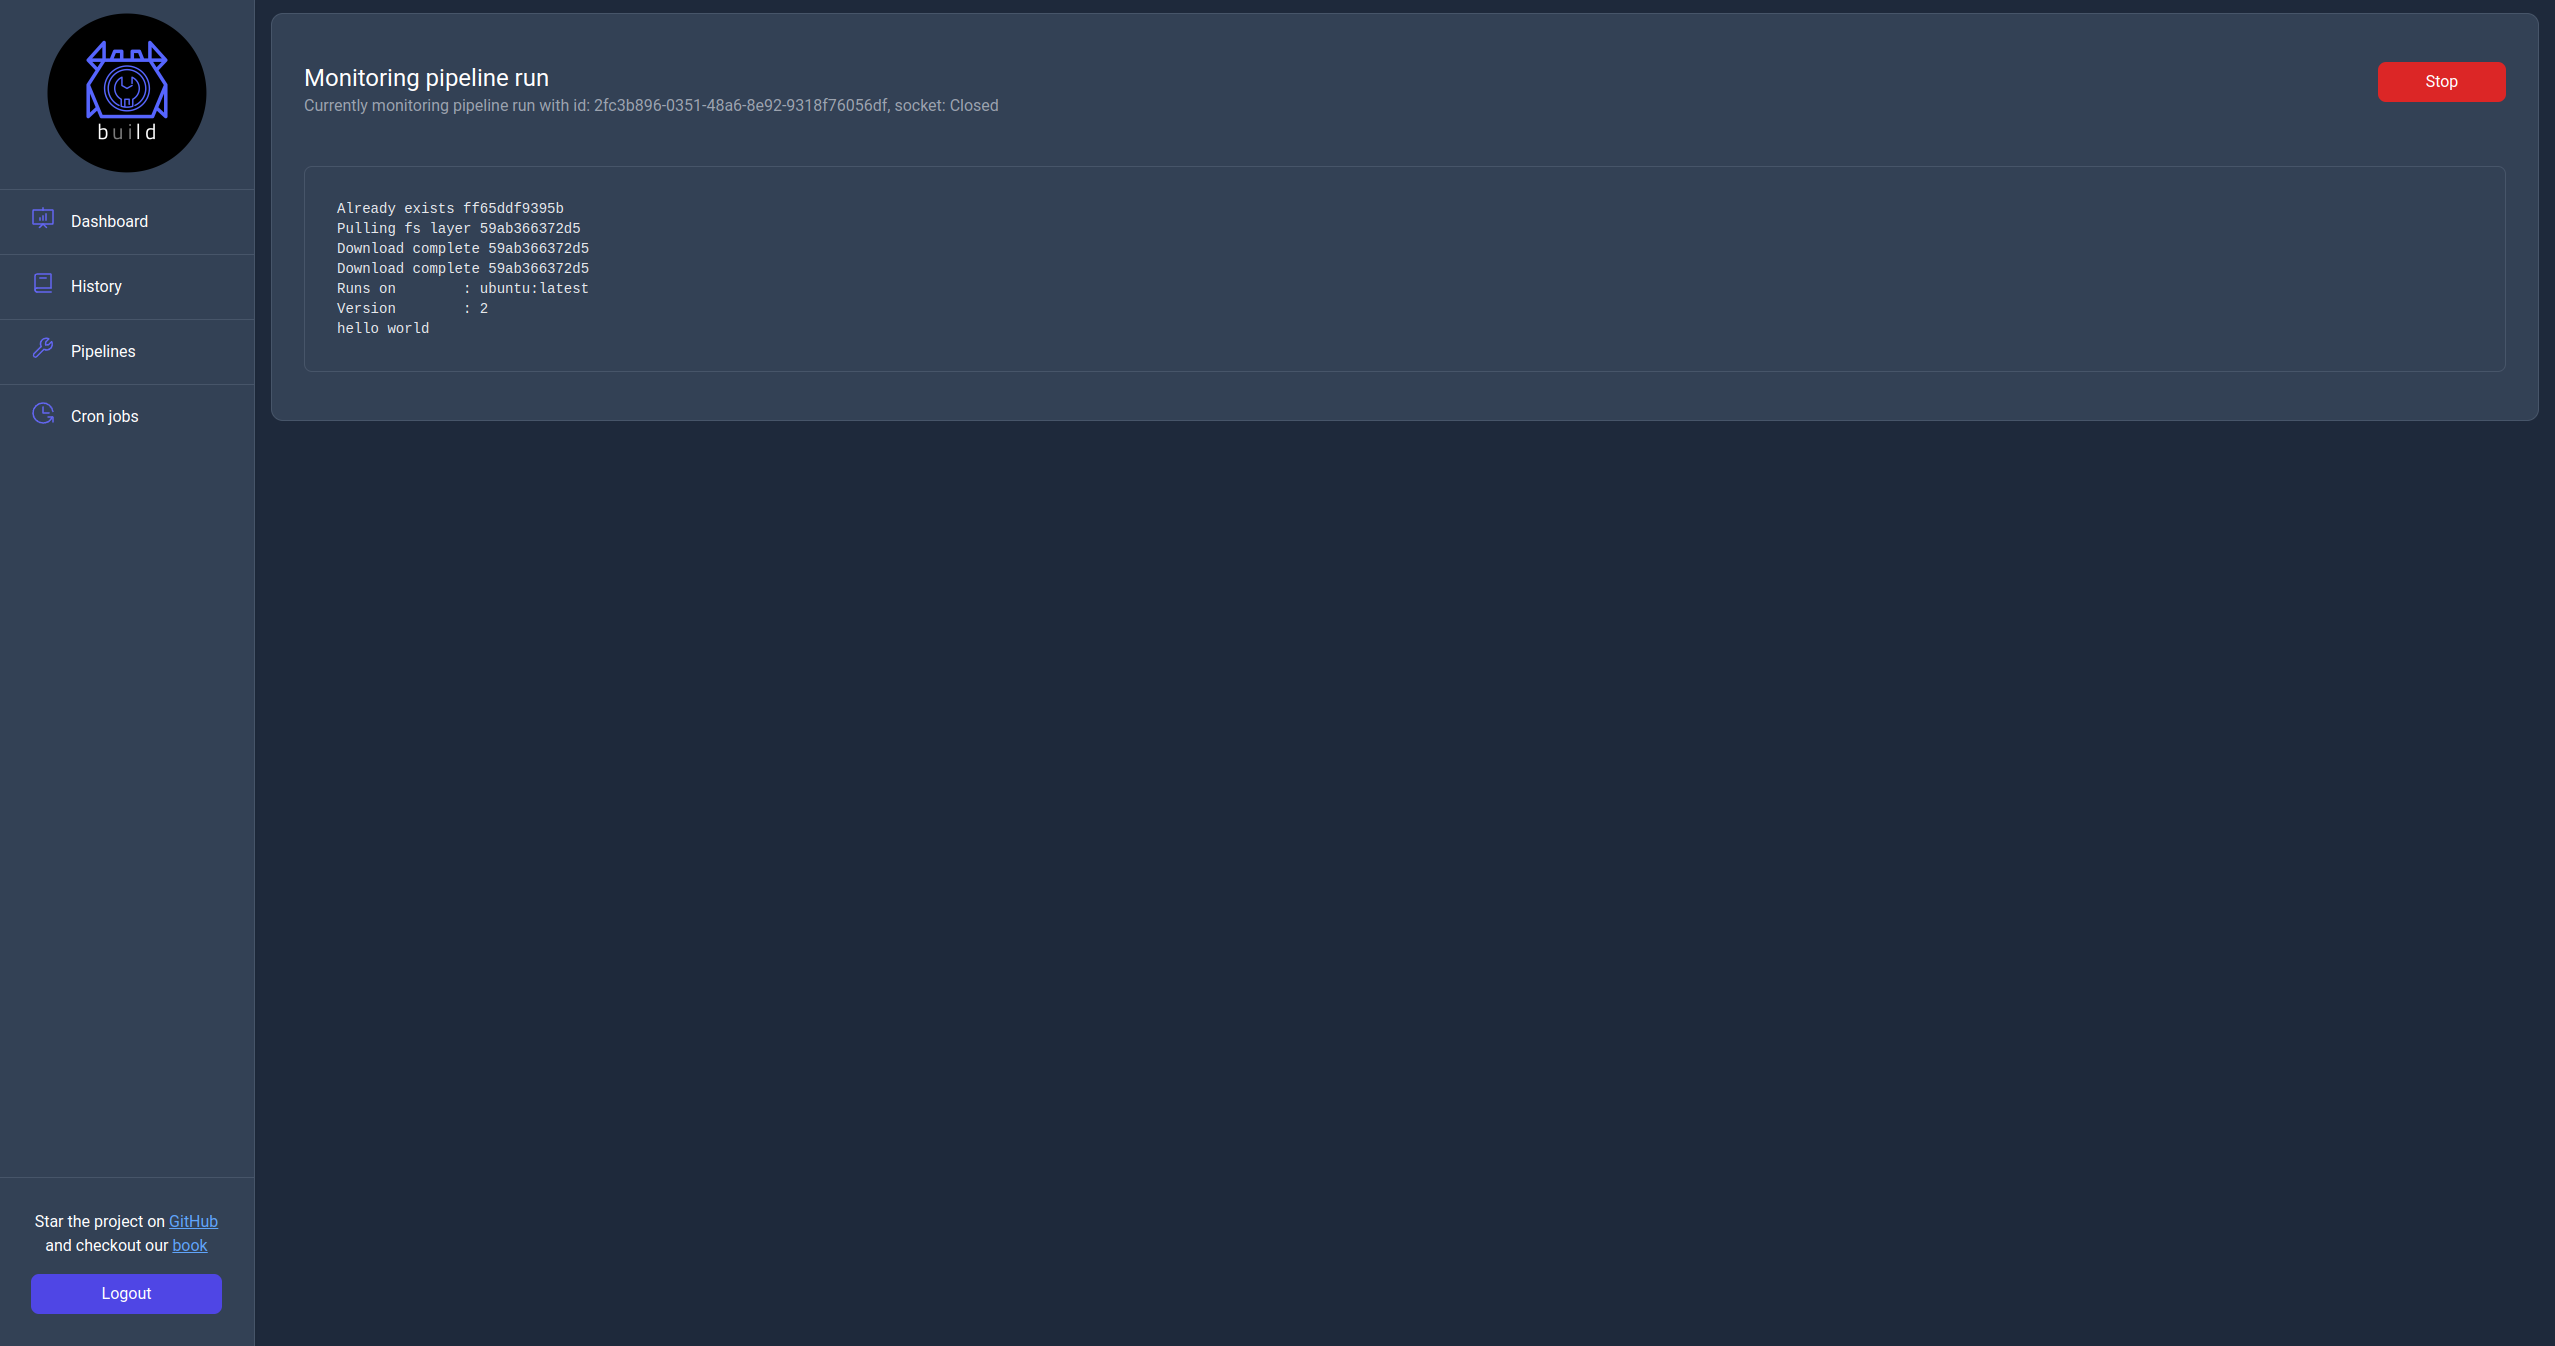
Monitor page
You can navigate to this page by clicking in the Id url of a pipeline run from either the History page or the history table in the details page of a pipeline.
Pipelines page
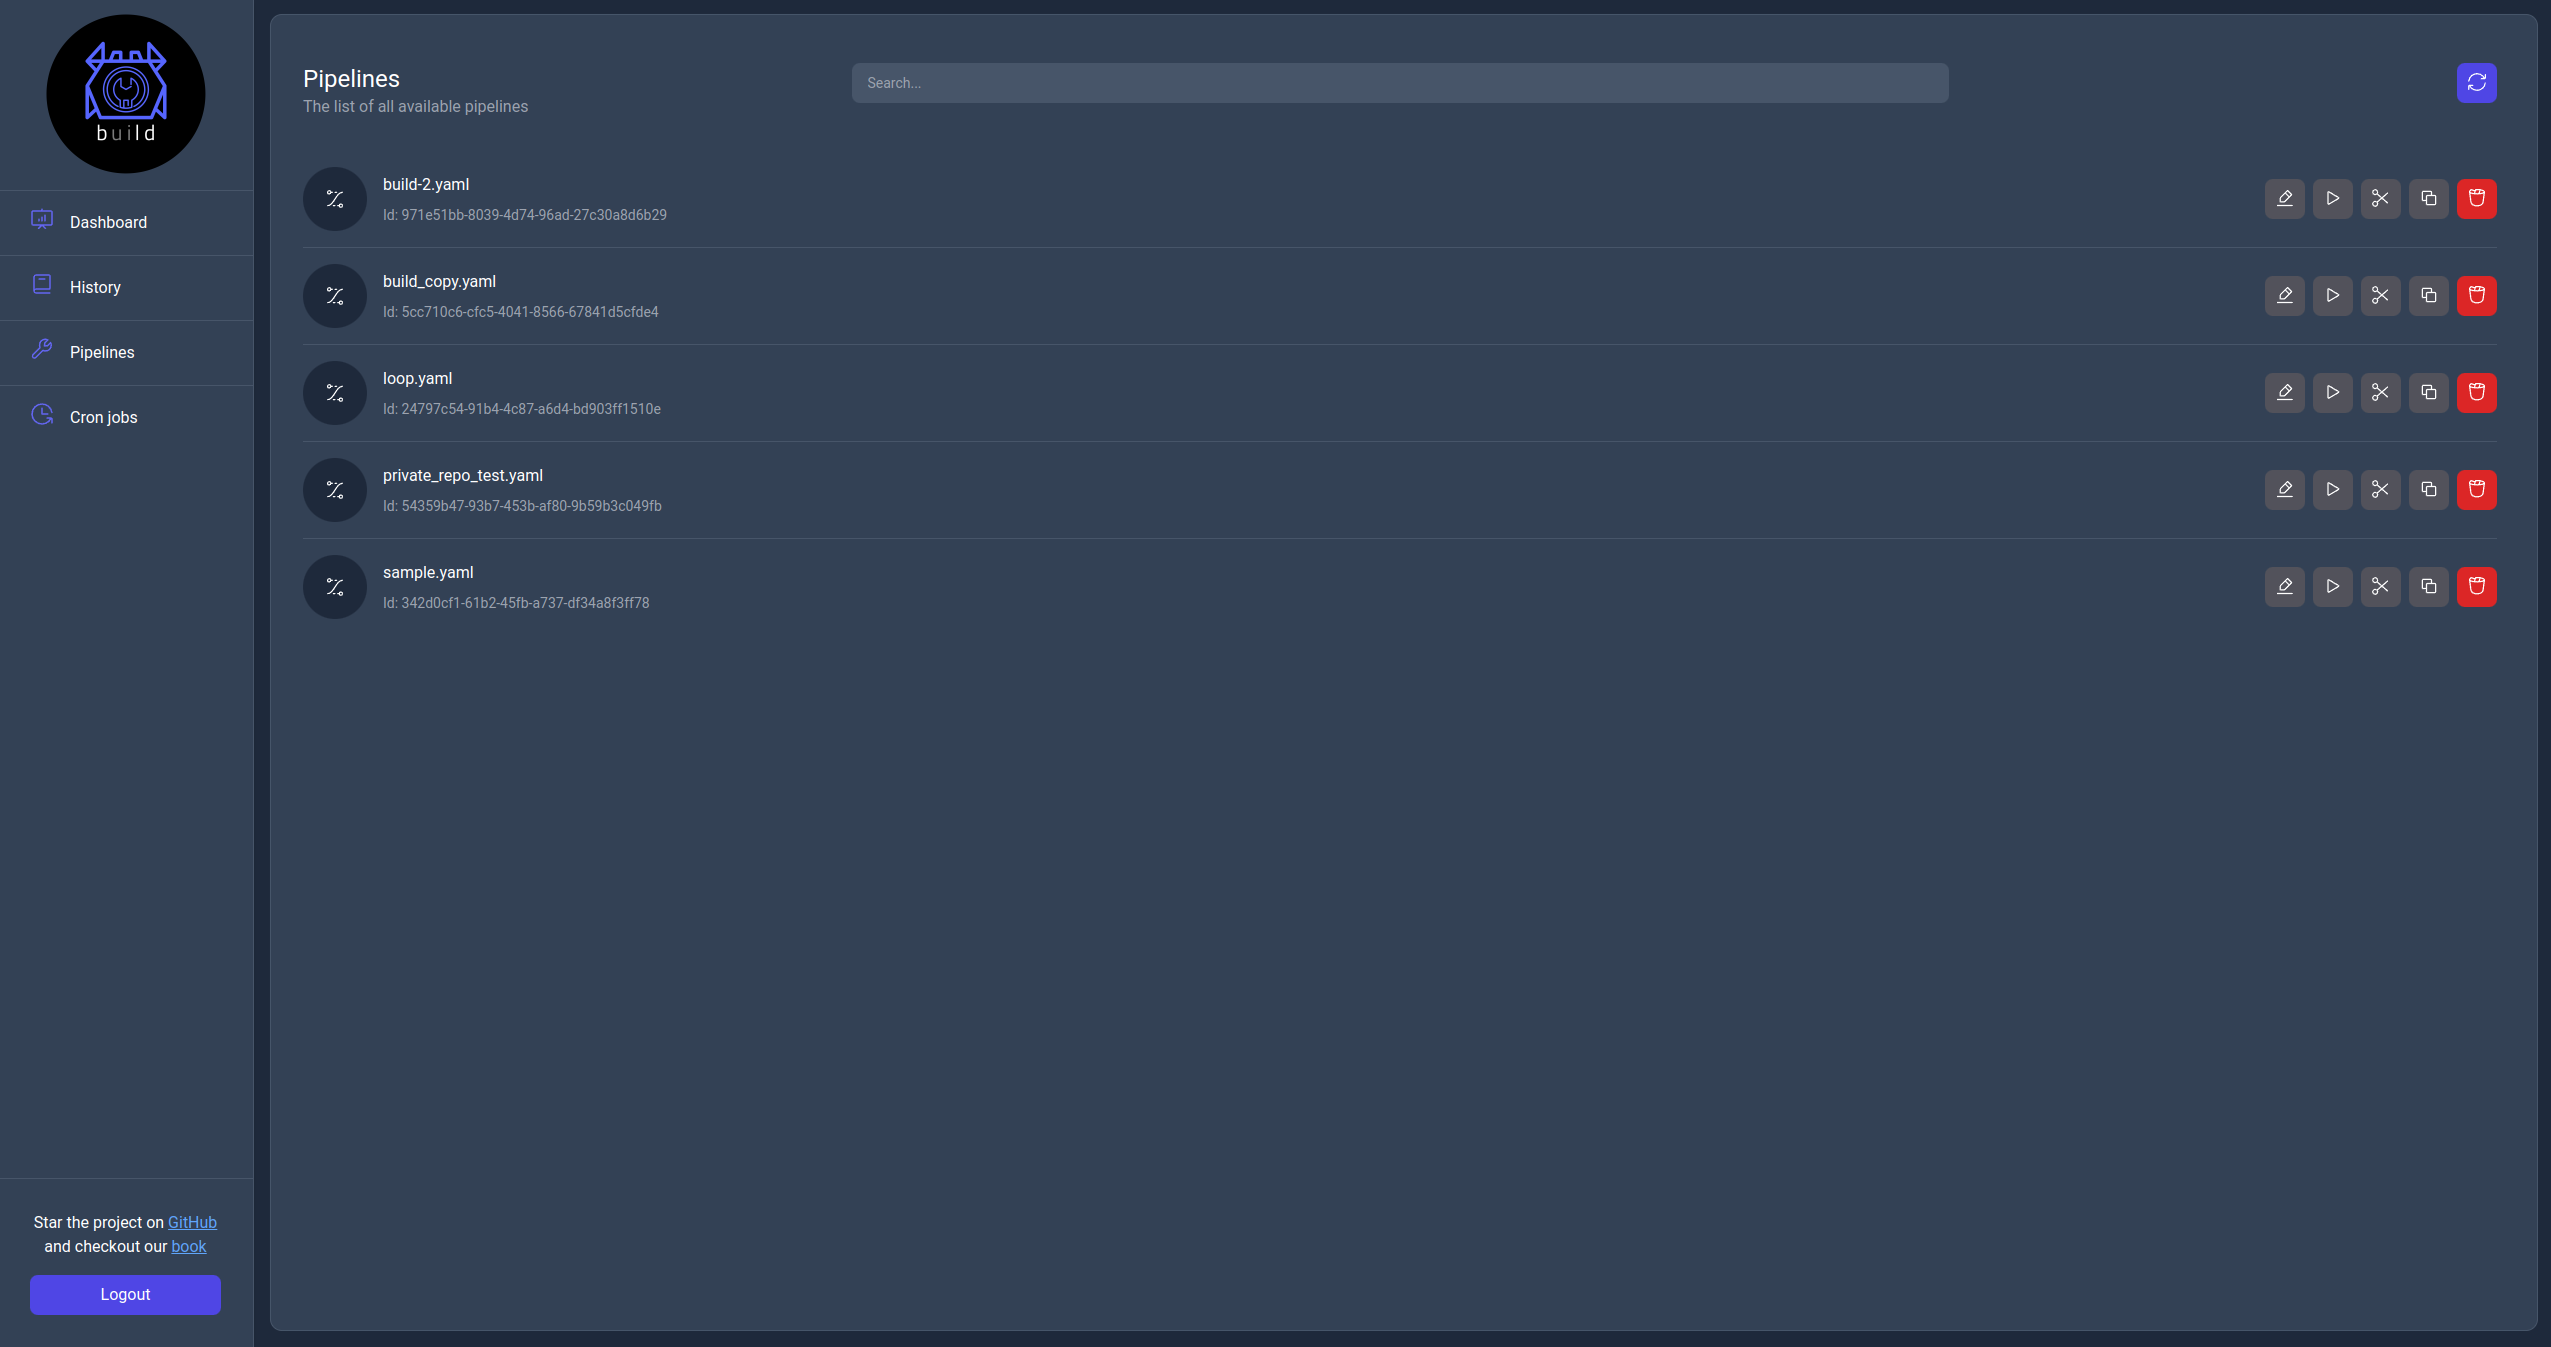
The pipelines page displays the list of pipelines available to the server with the ability to search, filter and perform actions on them.
For each pipelines the following actions are available:

Where each below is listed the action related to each one of them in the same order as they appear in the image above:
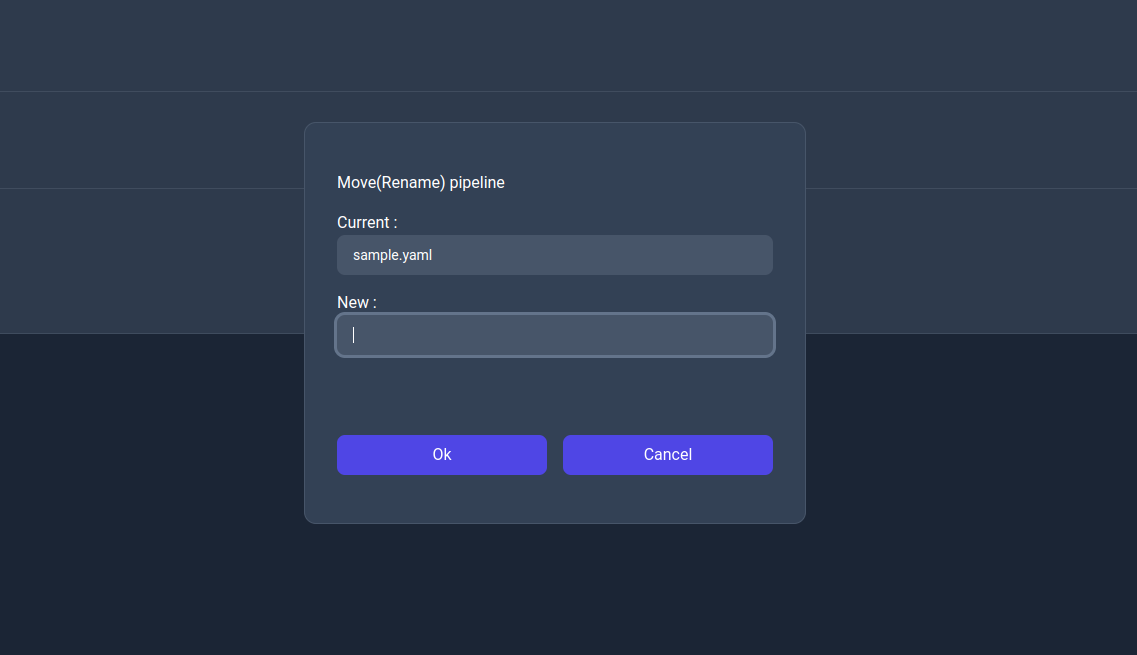
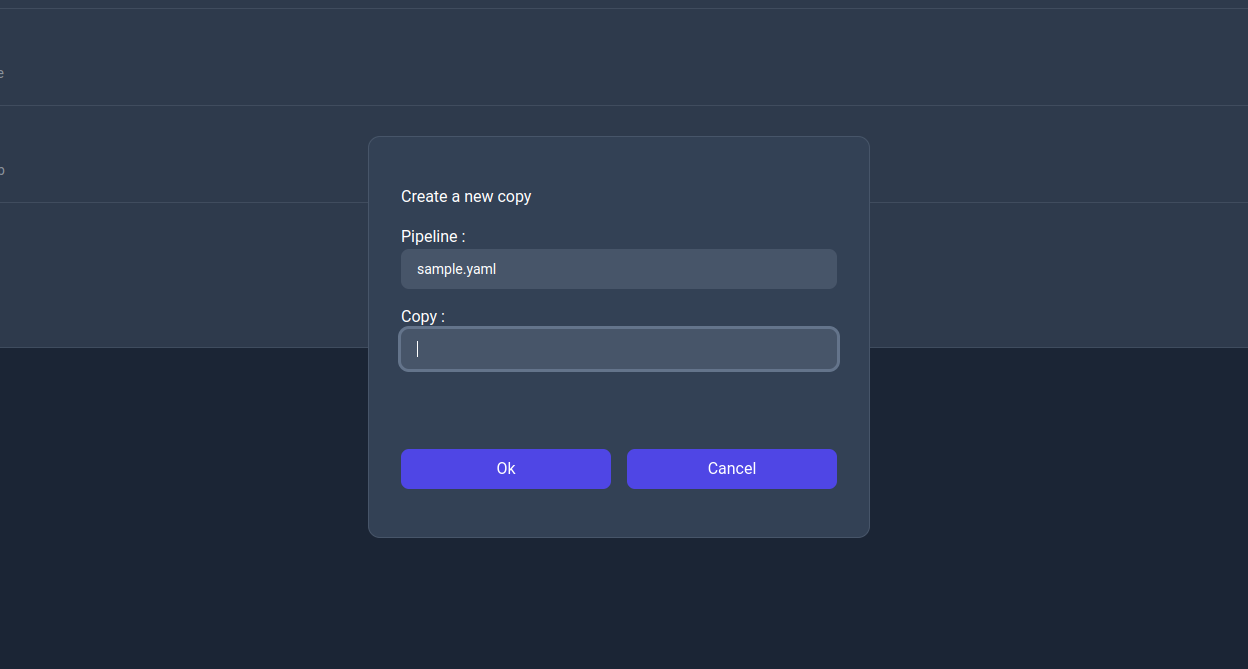
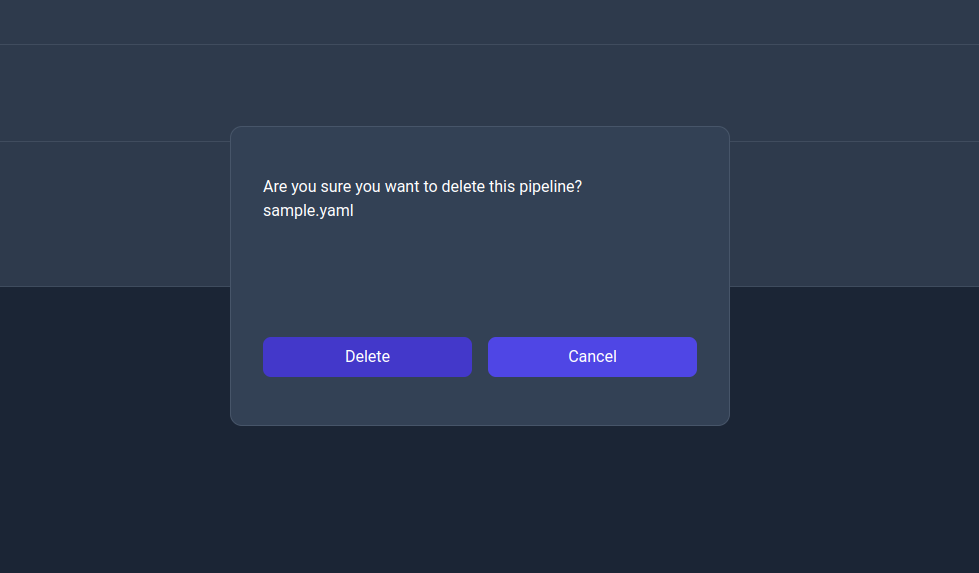
Edit: This action allows the user to edit the pipeline by navigating to its info page (as of v0.4 the ability to edit the pipelines isn't implemented so you can only inspect the information about the pipeline).Run: This action allows the user to run the pipeline by navigating to the run page.Move (Rename): This action allows the user to move the pipelines to a different path essentially renaming it.Copy: This action allows the user to create a new copy of the pipeline to a different path.Delete: This action allows the user to delete the pipeline.
Each operation triggers an action but some of them display a dialog to confirm or configure the operation.
Move (Rename) action dialog
Copy action dialog
Delete action dialog
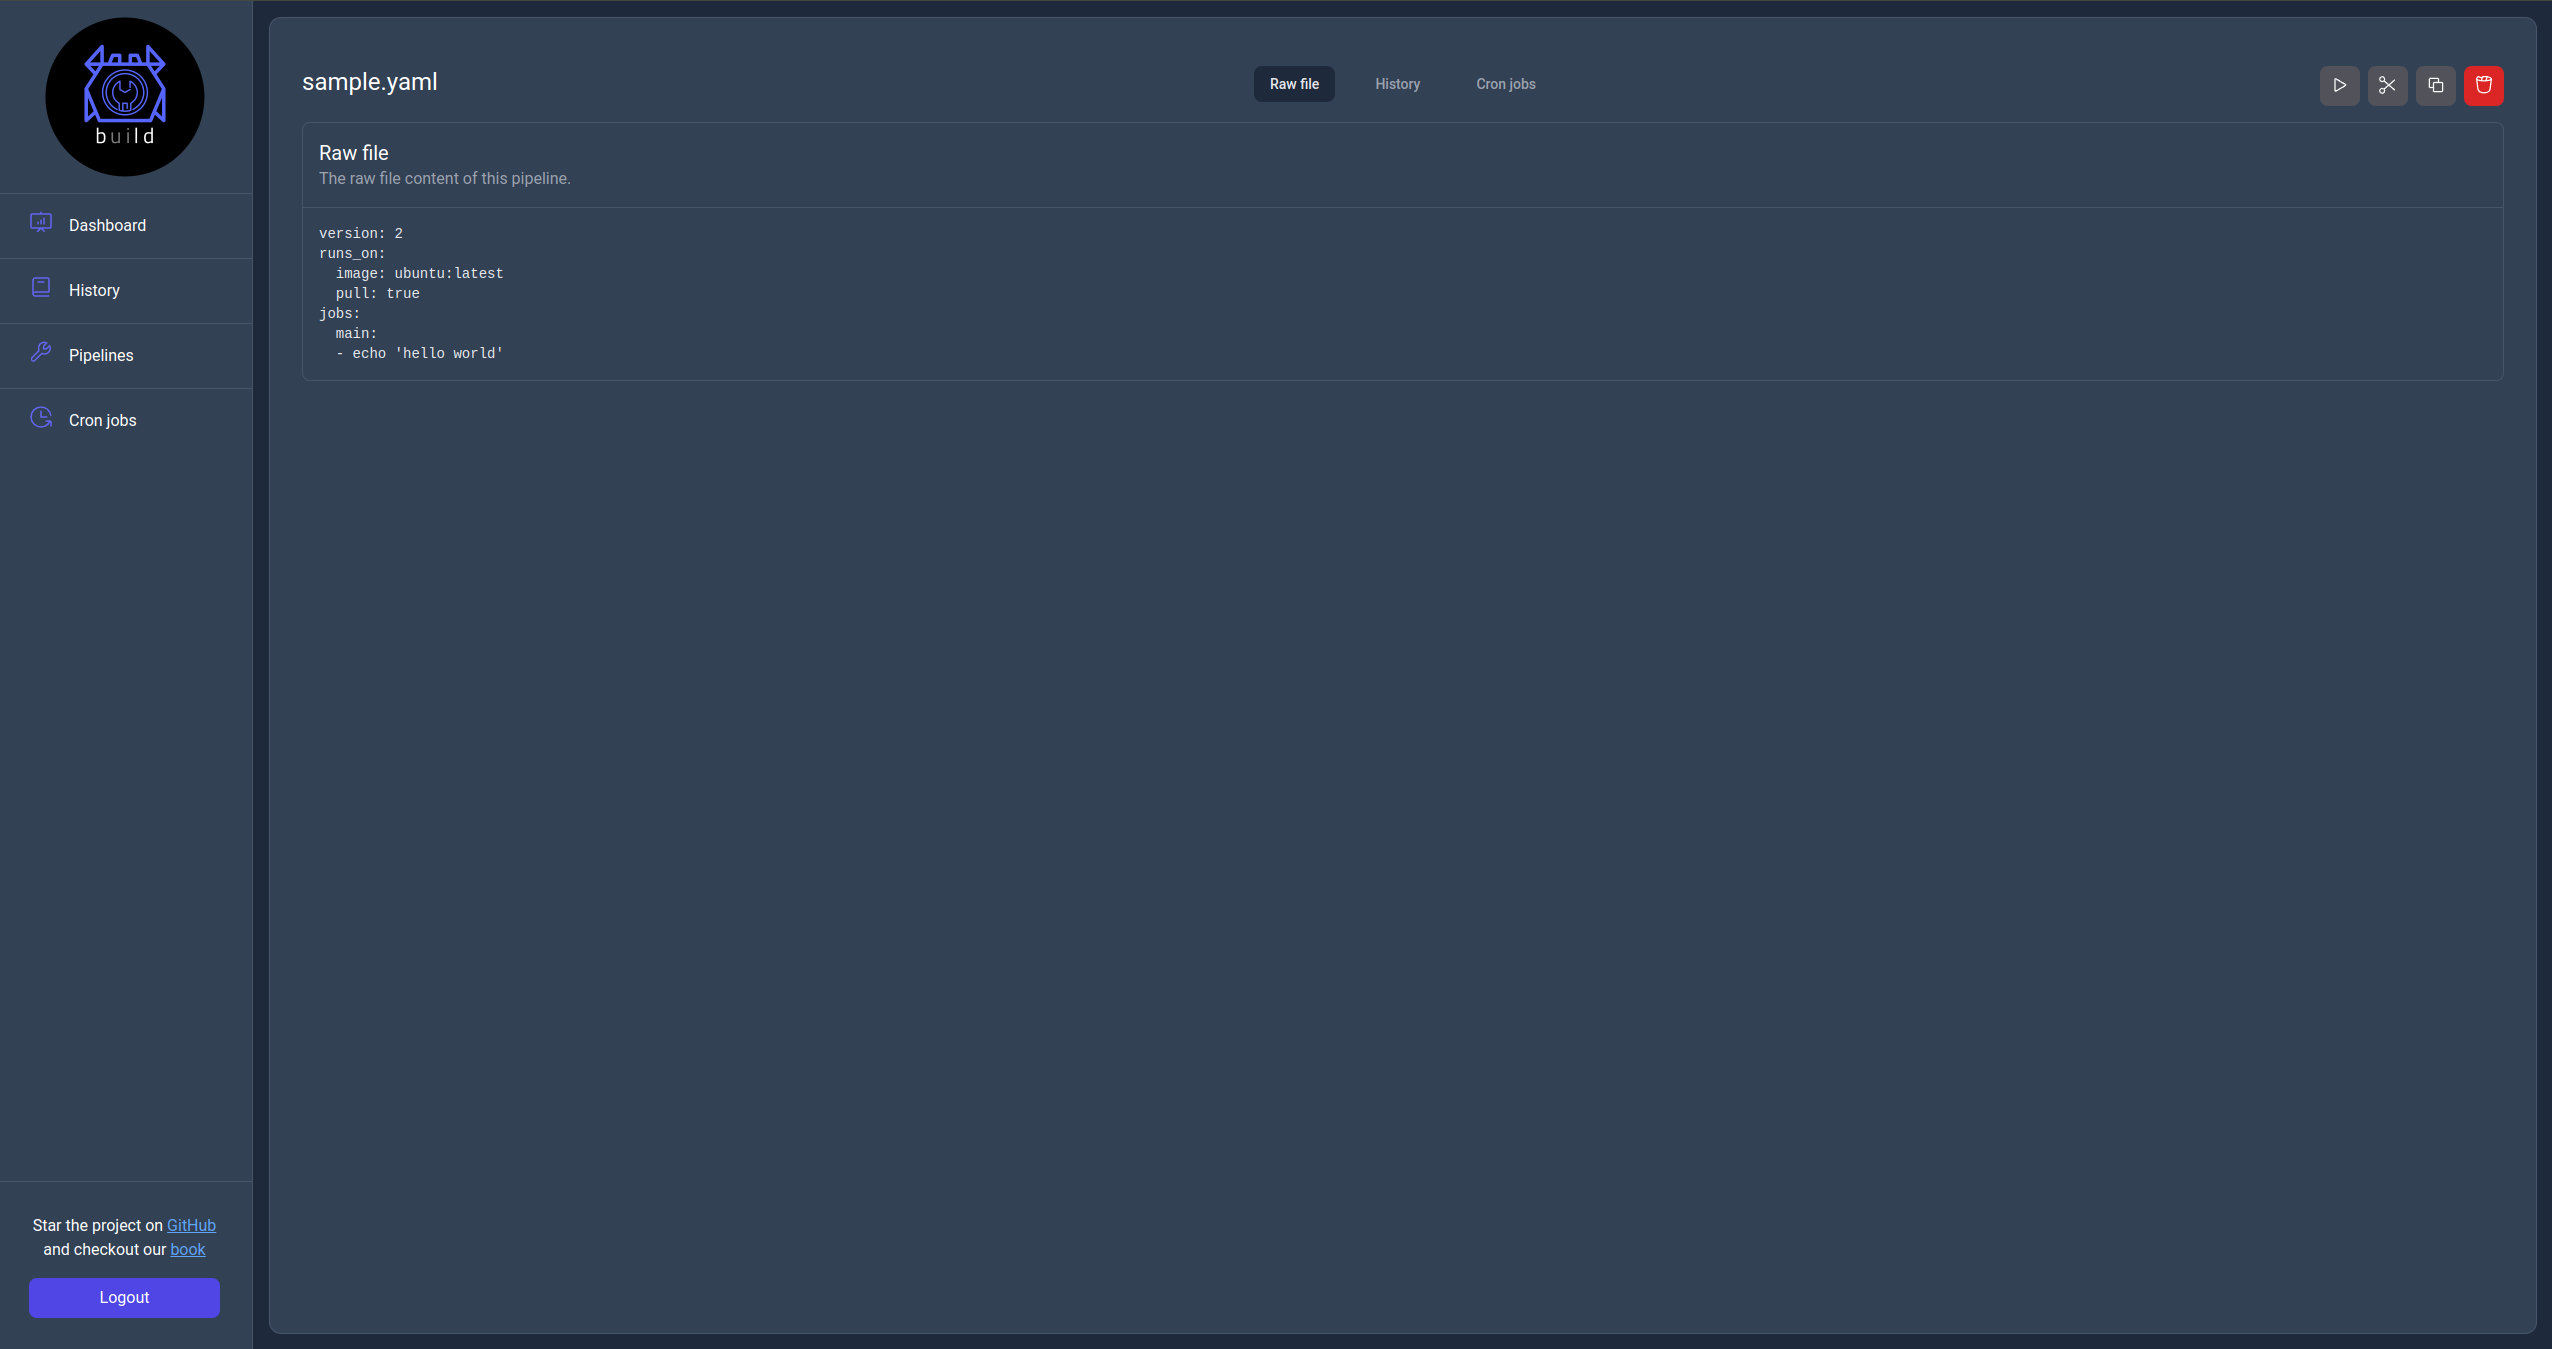
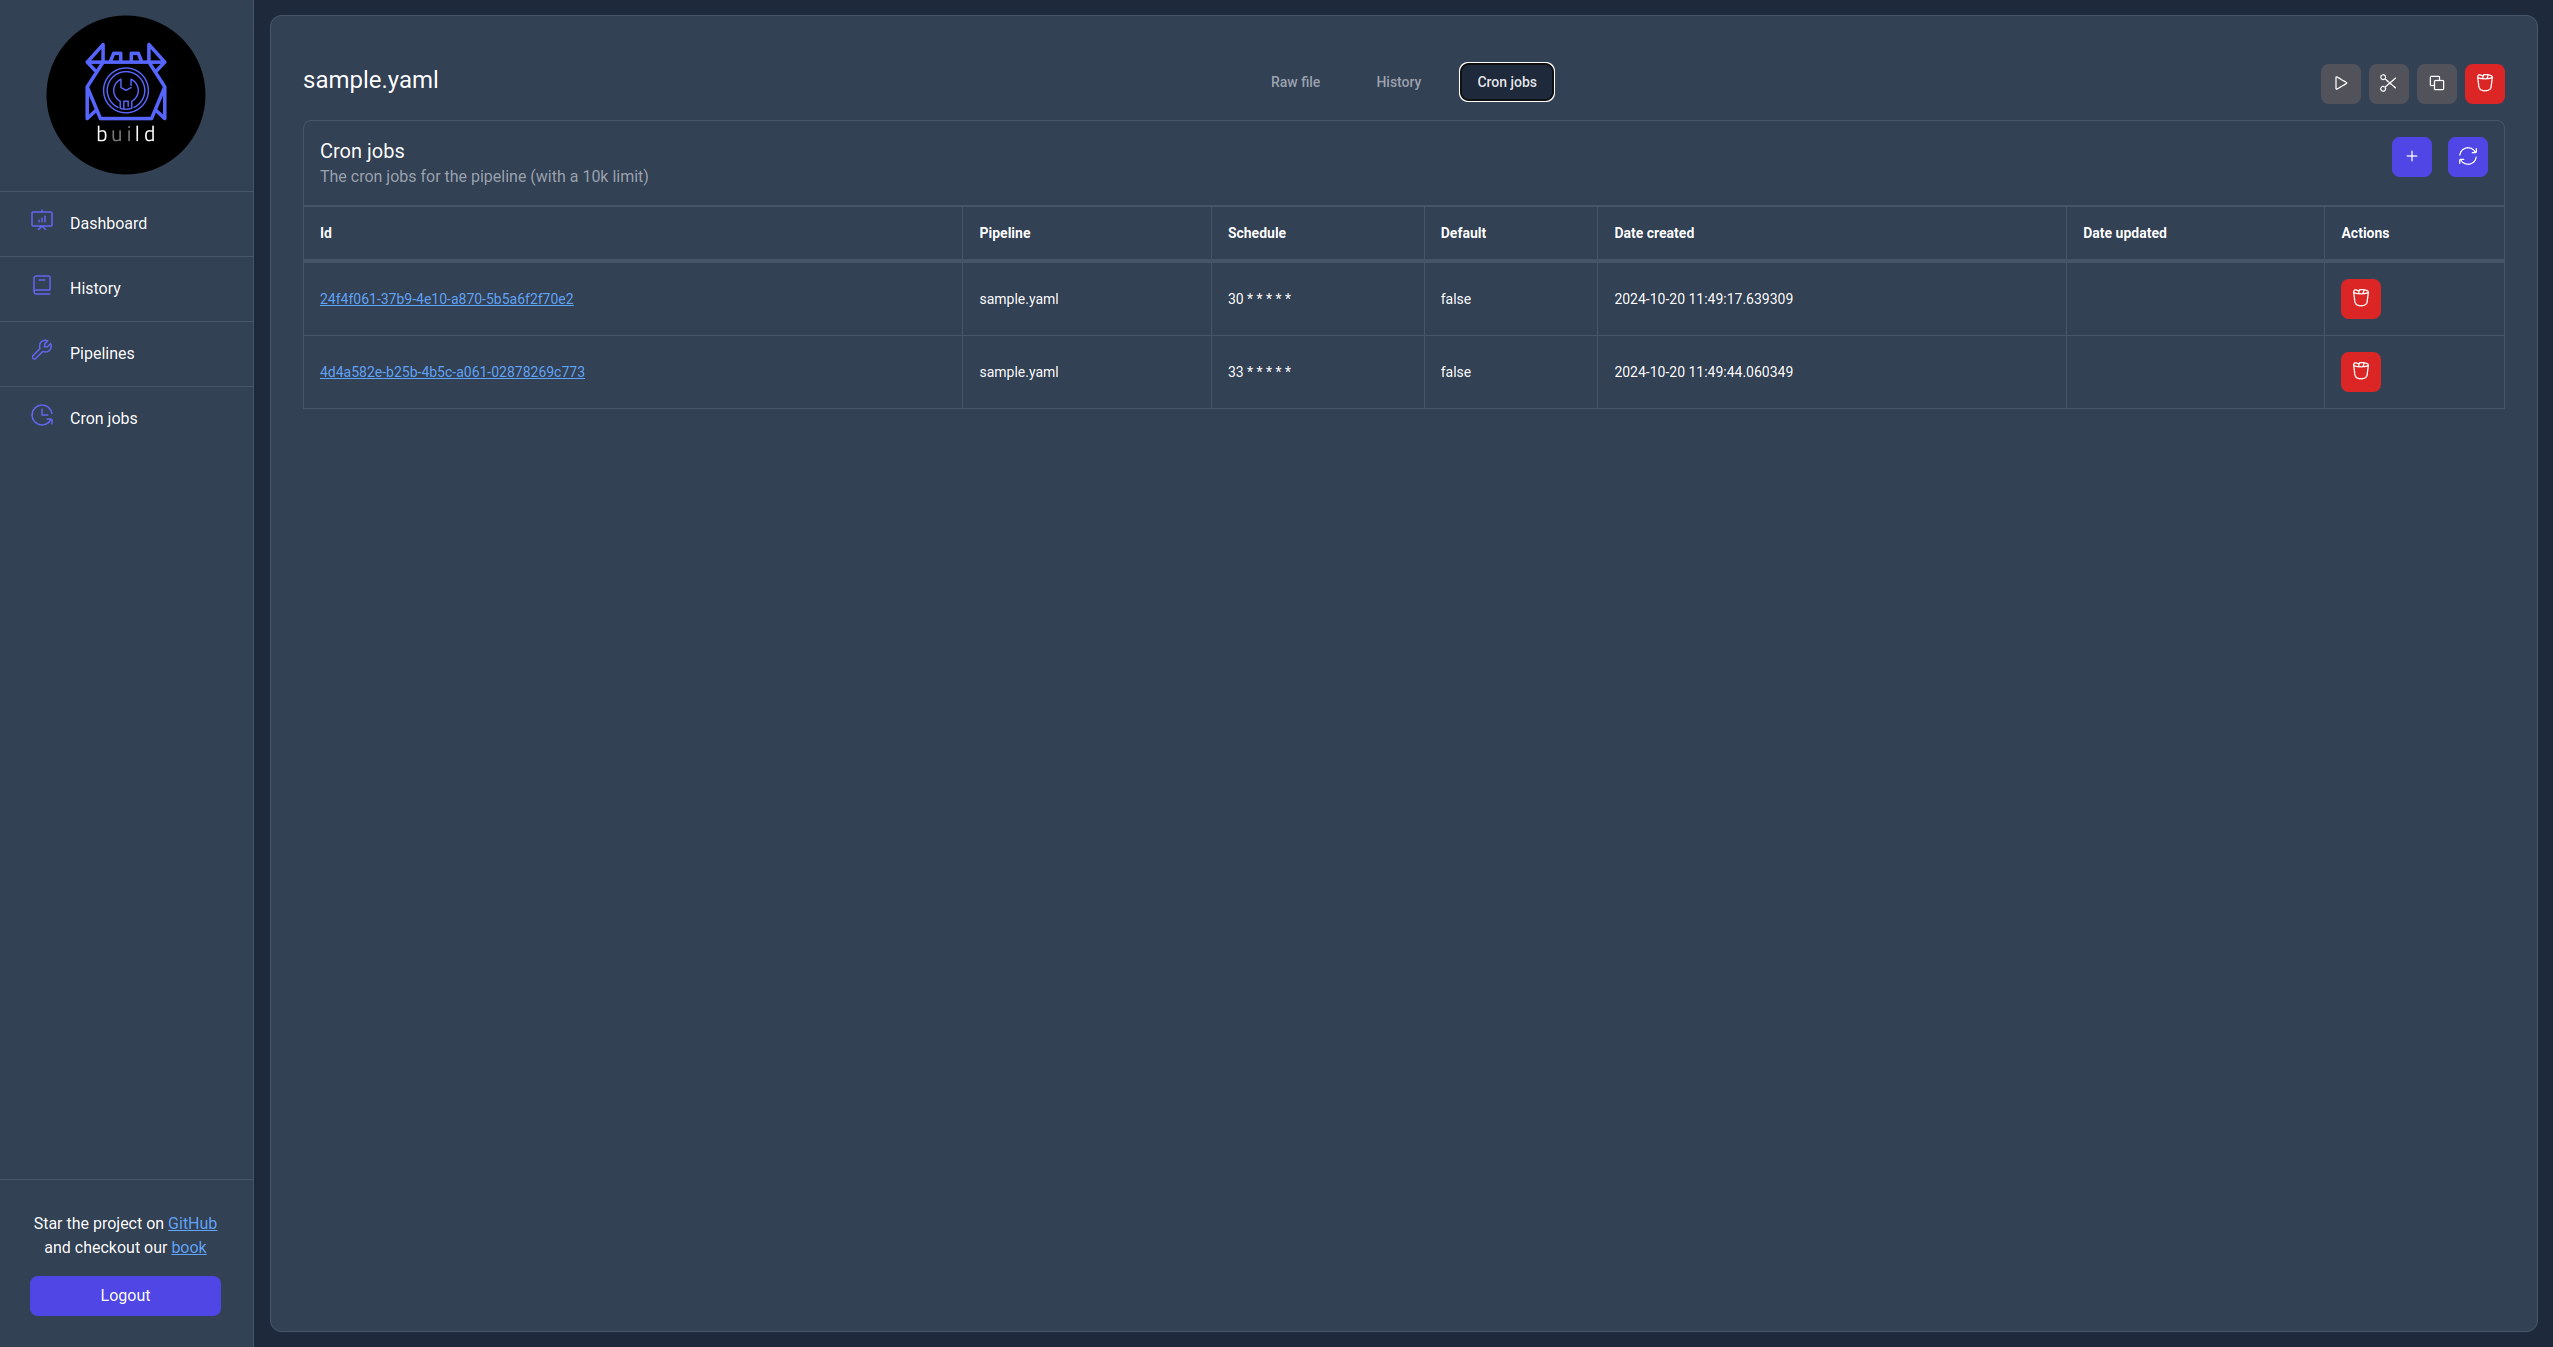
Pipelines information page
In the info page the user can see the actual pipeline file, runs and crons jobs configured. Additionally most actions available in the Pipelines page are also available here.
Raw file view
History view
Cron jobs view
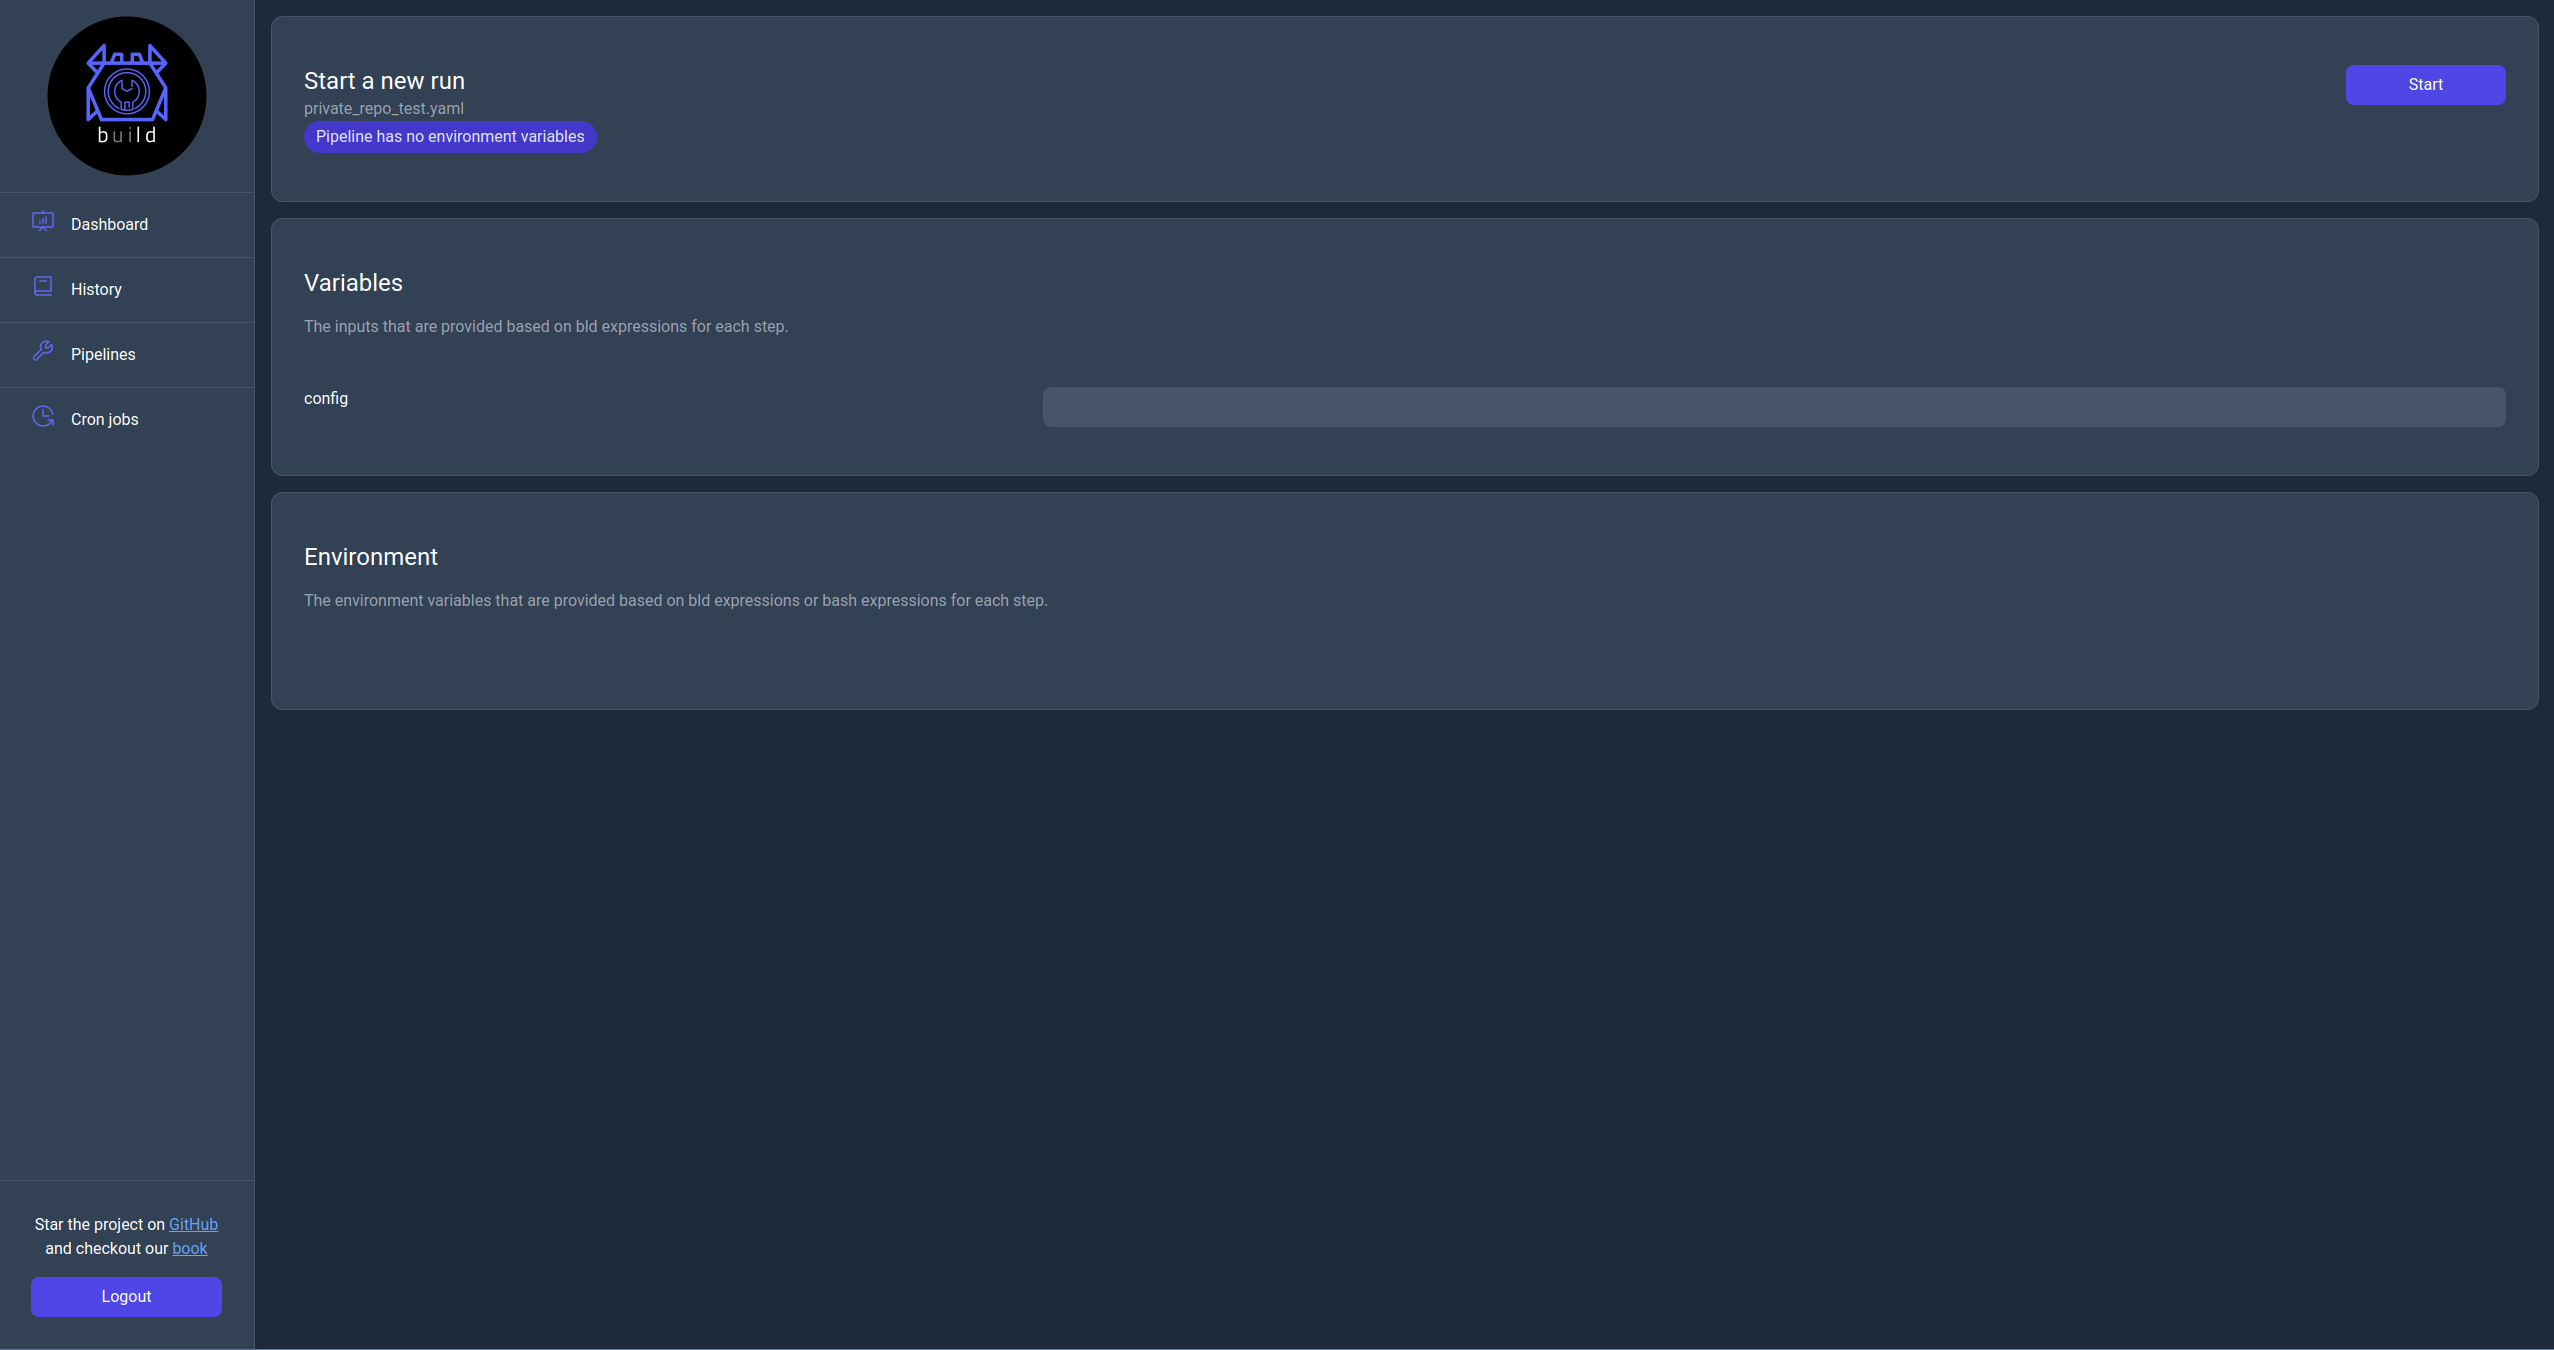
Run page
When a user click the Run action they will be navigated to this page which they can configure the run's variables and then start the pipeline. Once the use clicks start they will be navigated to the Monitor page.
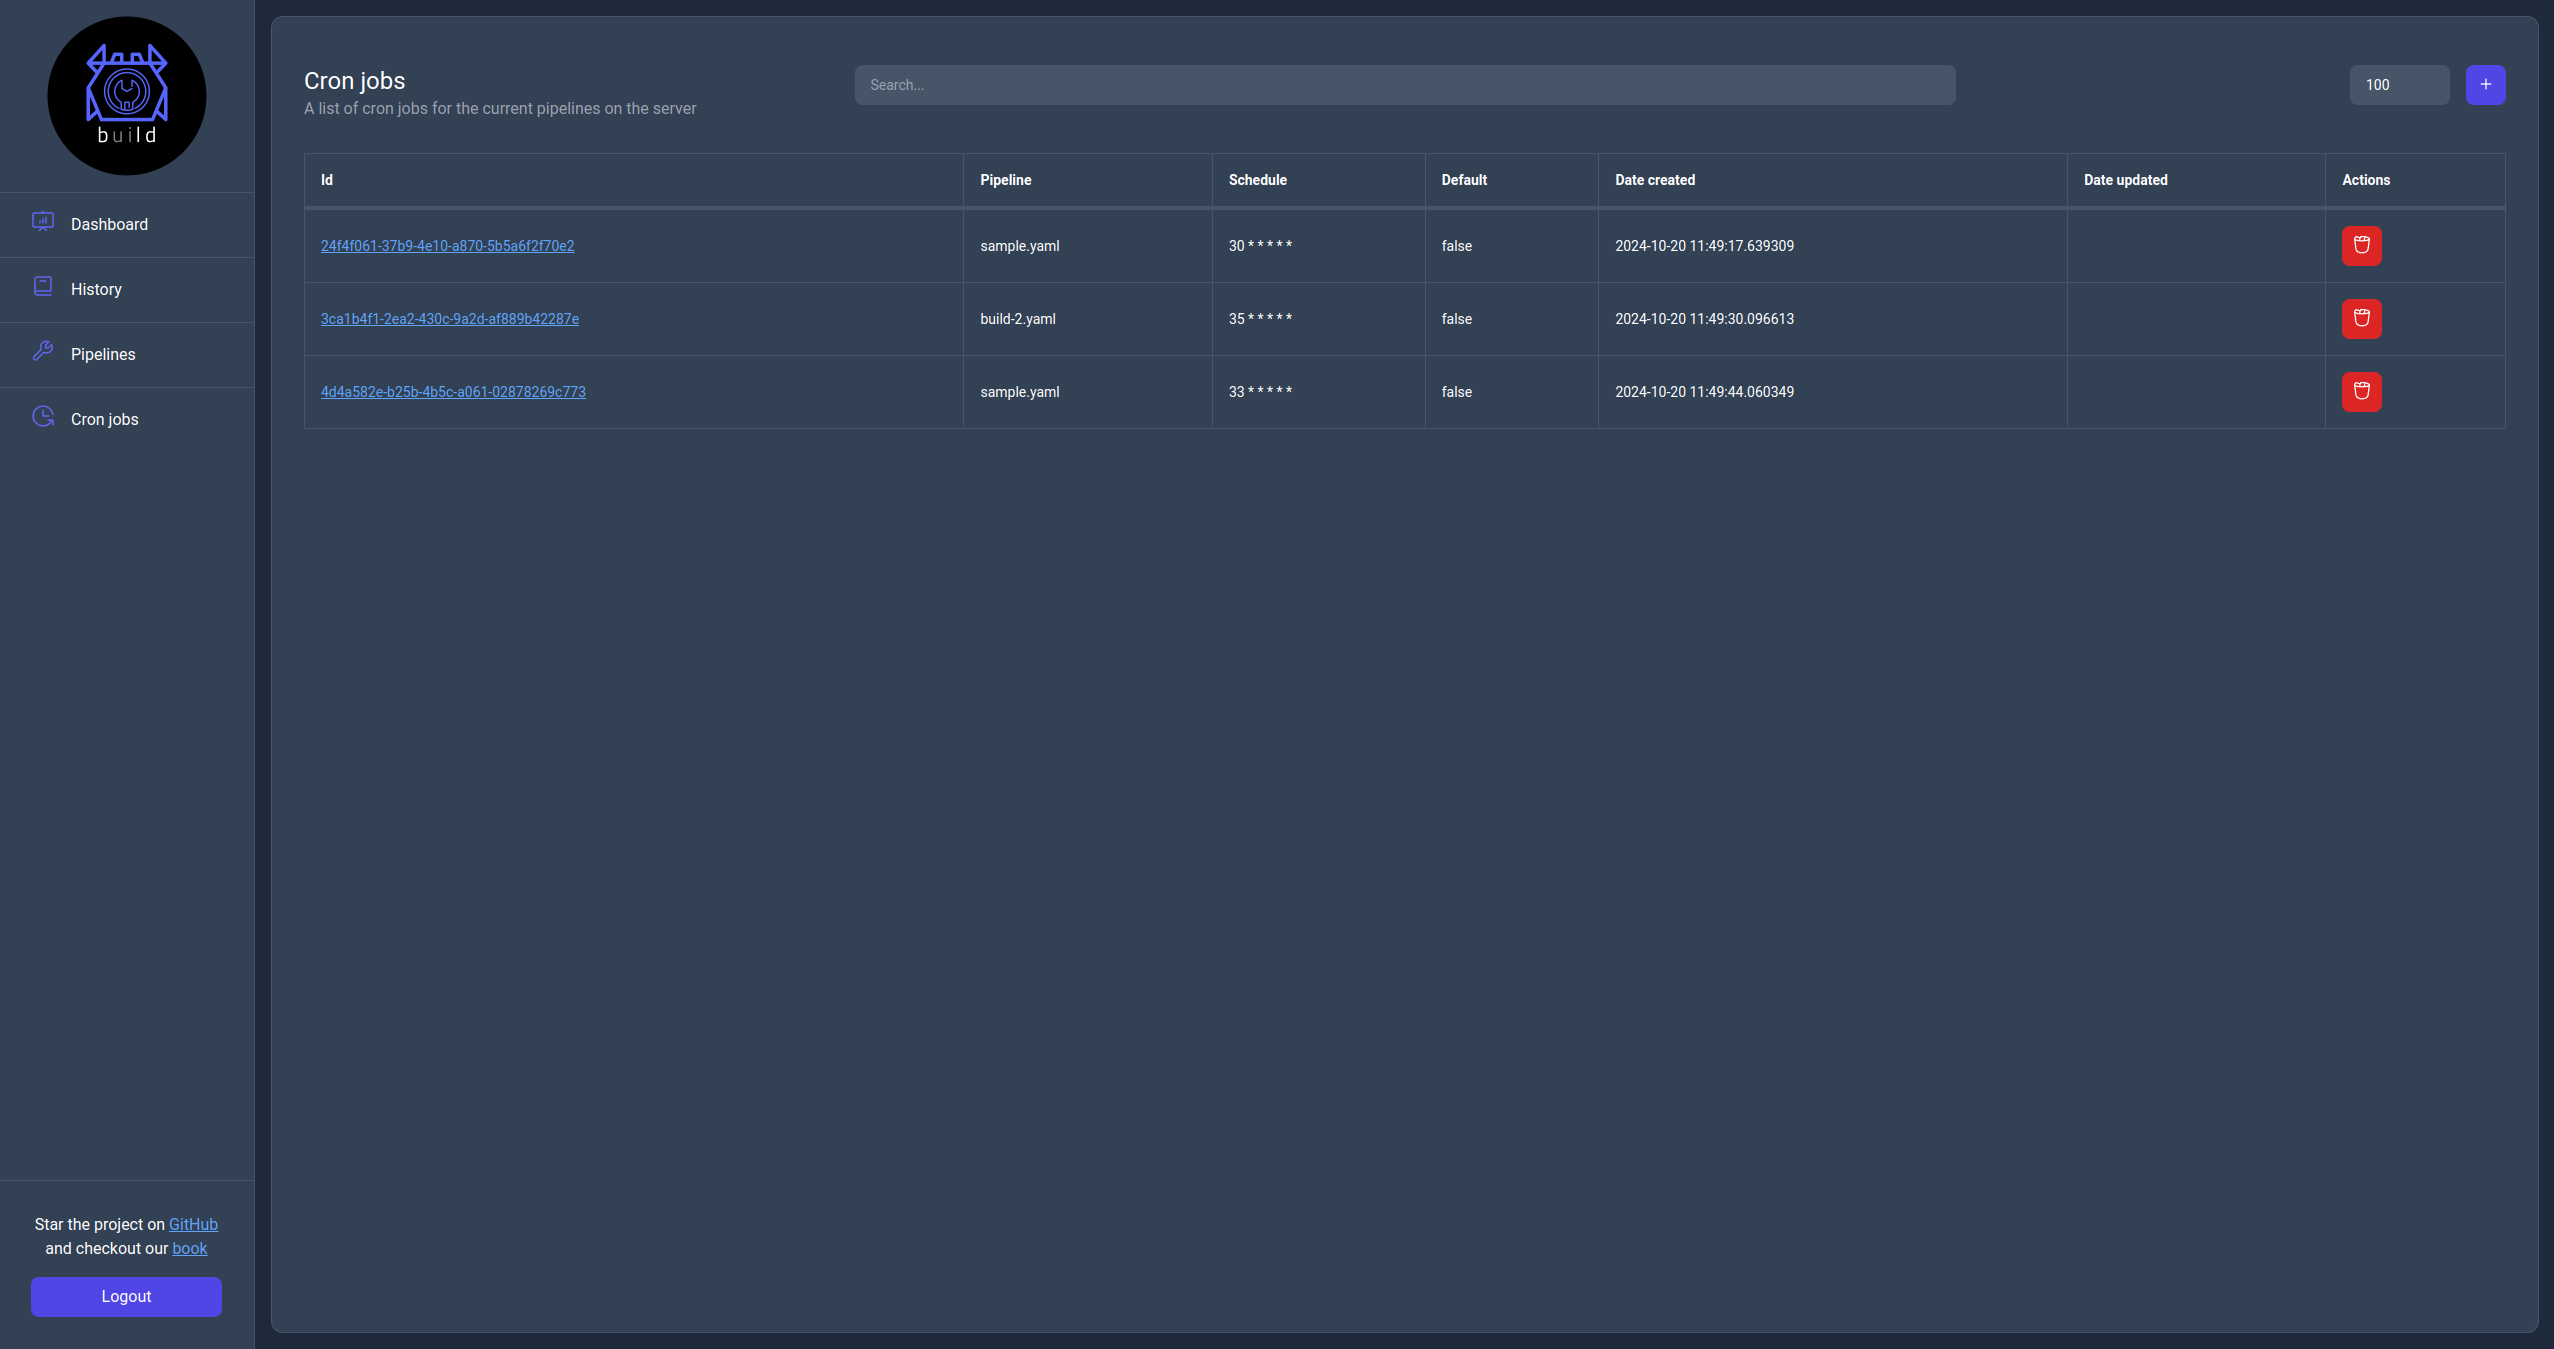
Cron jobs page
The cron jobs page displays the list of cron jobs available to the server with the ability to search, filter and perform actions on them.
The available action on this page are to create a new cron job, delete an existing one or click on the Id url to navigate to the cron job information page.
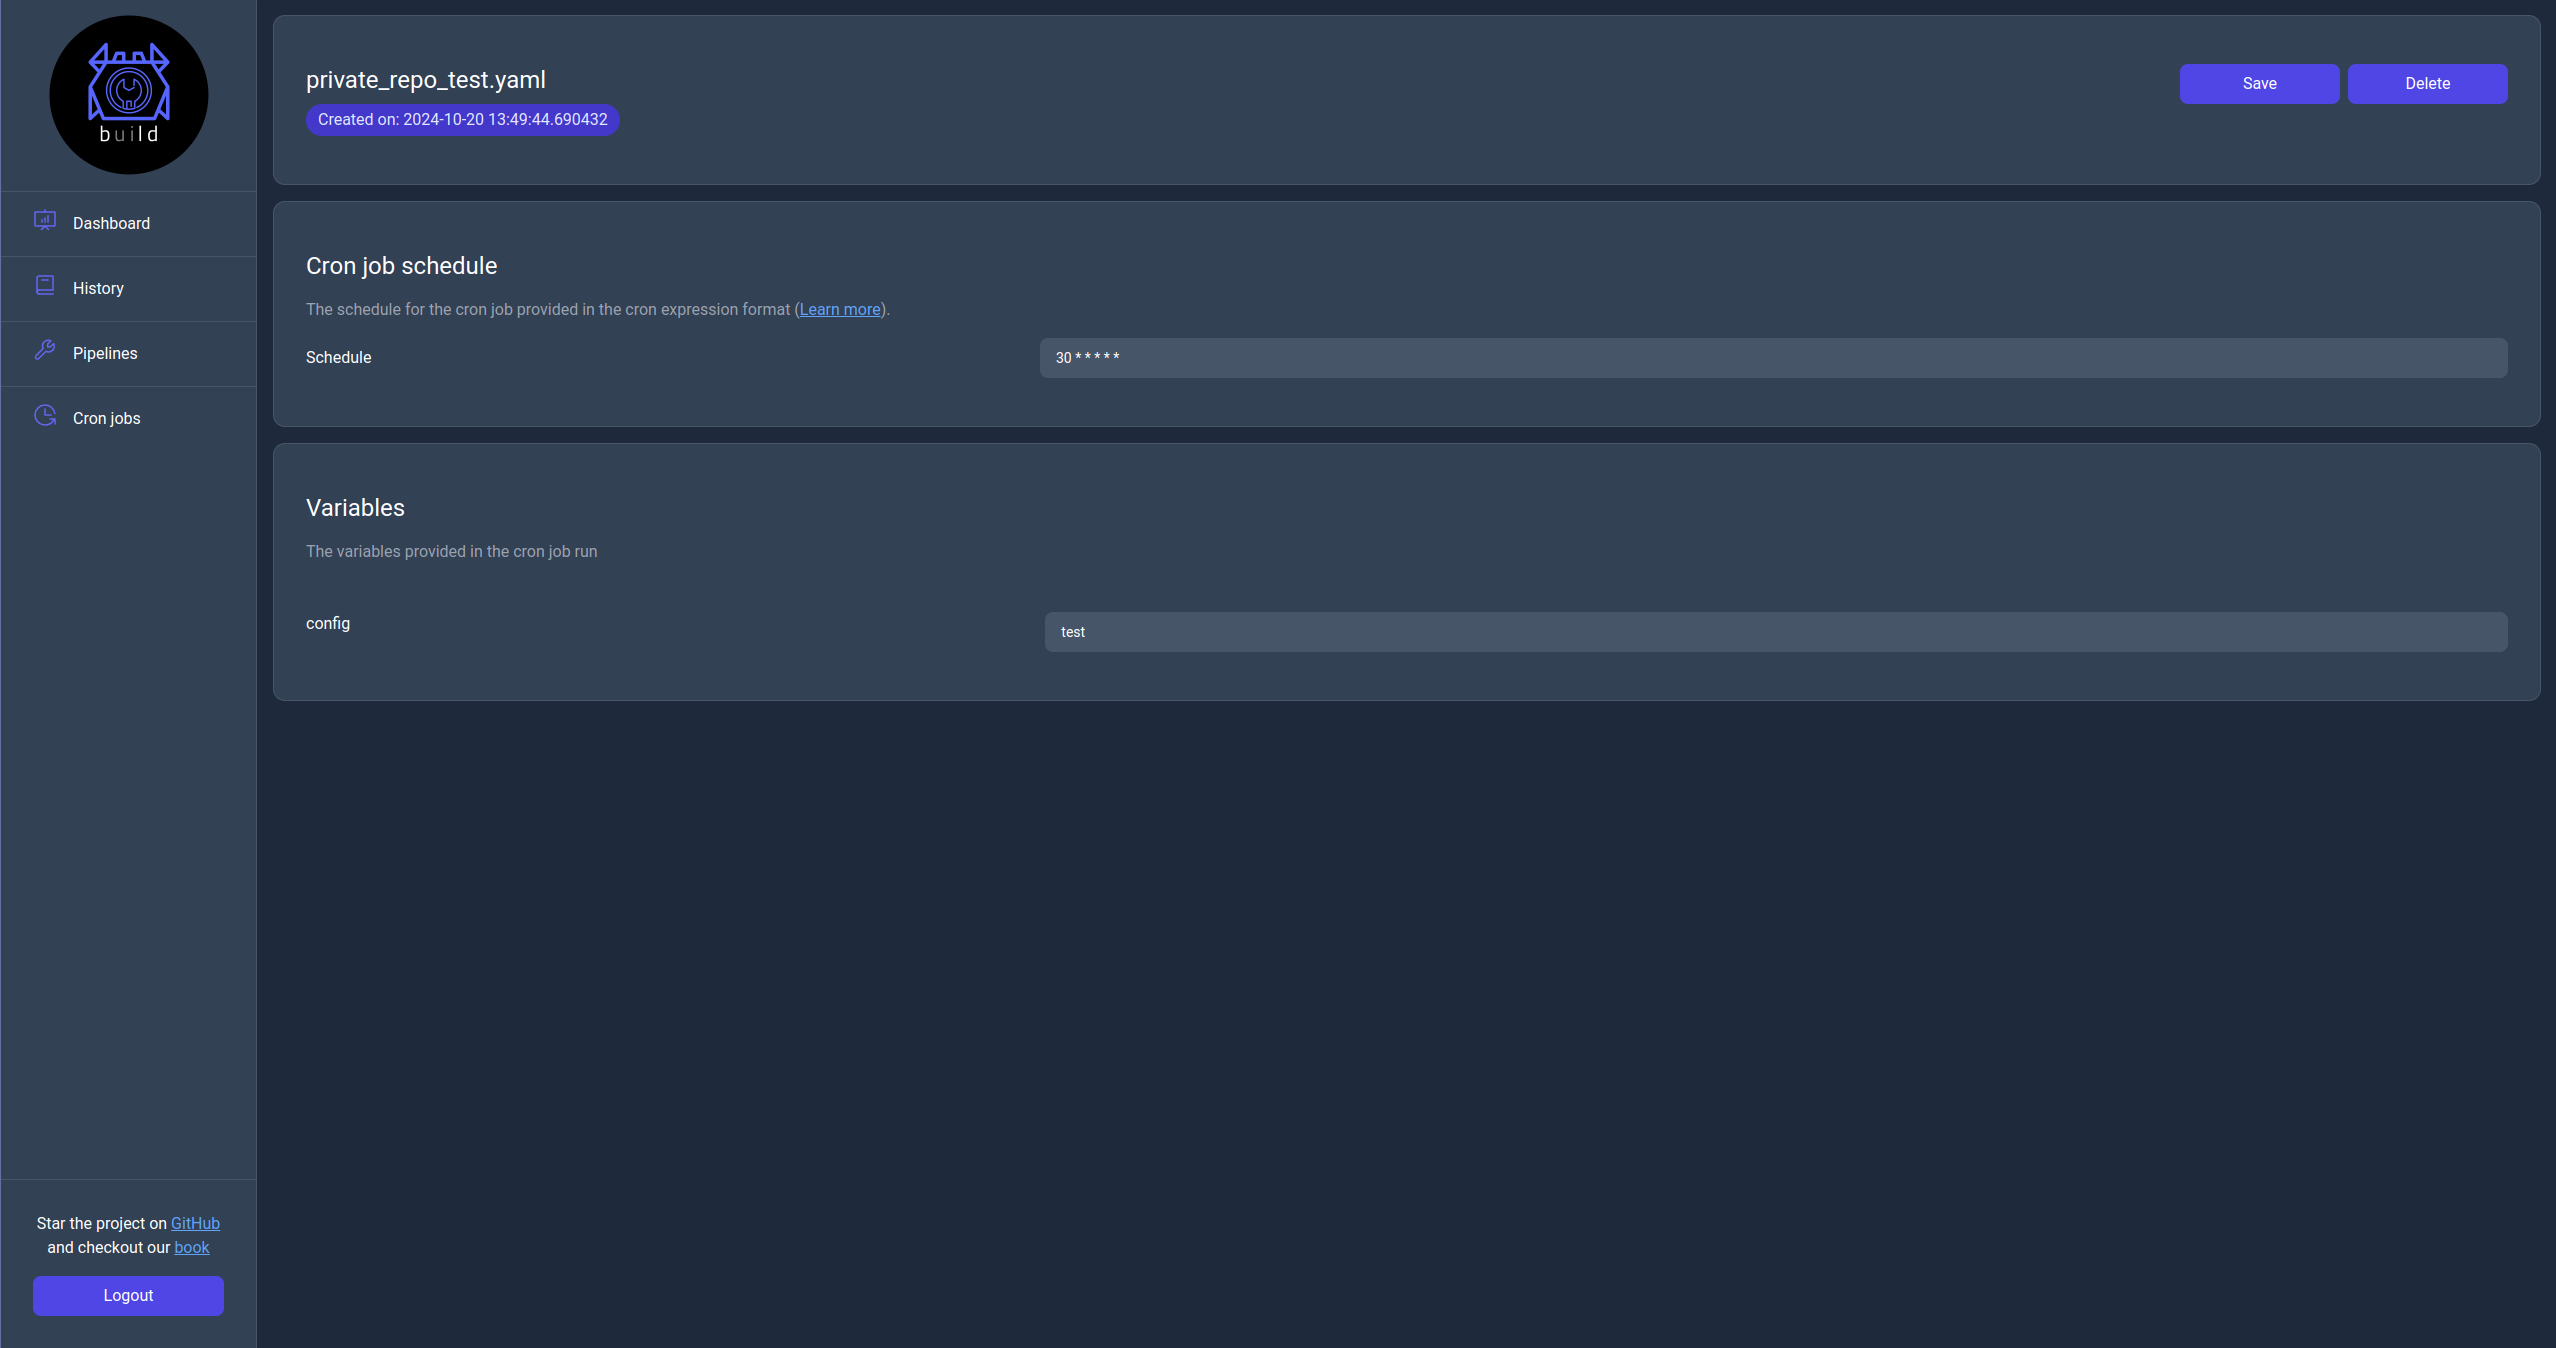
Cron job information page
In the cron job information page the user can see the actual cron job configuration and edit. There is also an option to delete the cron job from the server.
Github action
Bld has it's own custom github action called the bld-action. It's use case is to enable bld pipelines to run as part of a github workflow.
How to use
This action runs under the current repository and will look for a valid bld project with a .blddirectory. The action exposes a couple of arguments that can configure a run, and are similar to the options available to the run sub-command, since internally the action will invoke it to execute the pipeline. The available arguments are:
- pipeline: The name of the pipeline.
- server: The name of the server configuration that exists in the
.bld/config.yaml. - variables: A list of key values.
- environment: A list of key values.
Due to how the variables and environment variables are passed to the run sub-command you will need to use the below syntax to pass mulitple values in the workflow yaml file.
variables: |-
   var1=hello
   var2=world
Example usage in the bld repository
The build-musl.yaml pipeline that is responsible for creating the musl build of Bld uses a Dockerfile defined inside of the repository's .bld directory and executes a build of a specified branch with the default being master.
name: Bld build pipeline for musl
version: 2
runs_on:
  name: bld-musl-builder
  dockerfile: ${{bld_root_dir}}/Dockerfile
  tag: latest

variables:
    branch: master

jobs:
  main:
  - working_dir: /usr/src
    exec:
    - echo 'Cloning repository on branch ${{branch}}'
    - git clone -b ${{branch}} https://github.com/Kani-Maki-Gang/bld.git
  - working_dir: /usr/src/bld
    exec:
    - cargo build --release --target x86_64-unknown-linux-musl

artifacts:
  - method: get
    from: /usr/src/bld/target/x86_64-unknown-linux-musl/release/bld
    to: ./dist
    after: main
The github workflow uses the bld-action to run the build-musl.yaml pipeline under the current branch that the workflow was run on.
name: bld main workflow

on:
  push:
    branches: ["master"]
  pull_request:
    branches: ["master"]

jobs:
  build_musl:
    runs-on: ubuntu-latest
    name: Bld musl binary
    steps:
      - name: Checkout
        uses: actions/checkout@v3
      - name: Get branch name
        id: get_branch_name
        shell: bash
        run: echo "branch=${GITHUB_HEAD_REF:-${GITHUB_REF#refs/heads/}}" >> $GITHUB_OUTPUT
      - name: Run bld pipeline
        uses: Kani-Maki-Gang/bld-github-action@v0.2.1-alpha
        with:
          pipeline: 'build-musl.yaml'
          variables: |-
            branch=${{ steps.get_branch_name.outputs.branch }}
Note: The pipeline will be run using the
.bld/config.yamlfound in the repository.
Note: This action is still in alpha, one limitation is that the connection to docker needs to be specifically done using its unix socket since bld can't change how docker is started under the github workflow.
Command line interface
This section lists all available subcommands for the bld binary.
Cat
The cat sub-command will print the content of a pipeline on a Bld server.
options
- --verbose Sets the level of verbosity
- -p, --pipeline
The name of the pipeline to print - -s, --server
The name of the server to print the pipeline from - -h, --help Print help
- -V, --version Print version
usage
$ bld inspect -s local_server -p example_pipeline.yaml
Check
The check sub-command will validate a pipeline file for errors.
options
- --verbose Sets the level of verbosity
- -p, --pipeline
Path to pipeline script [default: default.yaml] - -s, --server
The name of the server to check the pipeline from
usage
$ bld check
$ bld check -s local_server -p example_pipeline.yaml
Config
The config sub-command lists all of Bld's configuration. This will also print configuration options that you might not have set but bld will assign a default value to.
options
- -e, --edit Edit the config file
- -h, --help Print help
- -V, --version Print version
usage
$ bld config
$ bld config -e # to edit the config file
Cp
The cp sub-command will copy local or server pipelines.
options
- --verbose Sets the level of verbosity
- -p, --pipeline
The pipeline to copy - -t, --target
The target path - -s, --server
The name of the server to execute the copy operation - -h, --help Print help
- -V, --version Print version
usage
$ bld cp -p source_pipeline.yaml -t target_pipeline.yaml # Copy local pipelines
$ bld cp -p source_pipeline.yaml -t target_pipeline.yaml -s local_server # Copy server pipelines
Cron
The cron subcommand provides functionality from manipulating cron jobs in a server.
commands
- cat Print detailed information for a registered cron job in a server
- add Adds a cron job to a server
- ls Lists all registered cron jobs in a server
- update Updates a cron job to a server
- rm Removes a registered cron job from a server
- help Print this message or the help of the given subcommand(s)
options
- -h, --help Print help
- -V, --version Print version
Cron cat
The cron cat subcommand prints detailed information for a registered cron job in a server.
options
- --verbose Sets the level of verbosity
- -s, --server
The name of the server to fetch the cron job from - -i, --id
The id of the target cron job - -h, --help Print help
- -V, --version Print version
usage
$ bld cron cat -i 5592508f-507c-4224-a7af-1983c2ccb971 -s local
Cron add
the cron add subcommand adds a cron job to a server.
options
- --verbose Sets the level of verbosity
- -s, --server
The name of the server to upsert the cron job to - -p, --pipeline
The name of the target pipeline - -S, --schedule
The new schedule for the cron job - -v, --variable
Define value for a variable. Can be used multiple times - -e, --environment
Define value for an environment variable. Can be used multiple times - -h, --help Print help
- -V, --version Print version
usage
$ bld cron add -s local -p sample-pipeline.yaml -S '10 * * * * * *' -v var1=hello -v var2=world -e env1='hello world'
Cron ls
The cron ls subcommand lists all registered cron jobs in a server.
options
- --verbose Sets the level of verbosity
- -s, --server
The name of the server to list the cron jobs from - -i, --id
The id of the target cron job - -p, --pipeline
The pipeline name for the target cron jobs - -S, --schedule
The schedule for the target cron jobs - -d, --default <IS_DEFAULT> Fetch only the default cron jobs [possible values: true, false]
- -l, --limit
Limit the results - -h, --help Print help
- -V, --version Print version
usage
$ bld cron ls -s local
$ bld cron ls -s local -p sample-pipeline.yaml
$ bld cron ls -s local -p sample-pipeline.yaml -l 10
$ bld cron ls -s local -l 10 -d true
Cron update
The cron update subcommand updates a cron job to a server.
options
- --verbose Sets the level of verbosity
- -s, --server
The name of the server to upsert the cron job to - -i, --id
The id of the target cron job - -S, --schedule
The new schedule for the cron job - -v, --variable
Define value for a variable. Can be used multiple times - -e, --environment
Define value for an environment variable. Can be used multiple times - -h, --help Print help
- -V, --version Print version
usage
$ bld cron update -s local -i 5592508f-507c-4224-a7af-1983c2ccb971 -S '10 * * * * * *' -v var1=hello -e env1=world
Cron rm
The cron rm subcommand removes a registered cron job from a server.
options
- --verbose Sets the level of verbosity
- -i, --id <CRON_JOB_ID> The id of the cron job to remove
- -s, --server
The name of the server to remove the cron job from - -h, --help Print help
- -V, --version Print version
usage
$ bld cron rm -s local -i 5592508f-507c-4224-a7af-1983c2ccb971
Help
The help sub-command will print the general help message for the Bld command line interface or the appropriate help message for another sub-command.
usage
$ bld help
$ bld help run
$ bld help push
$ bld help stop
Hist
The hist sub-command will fetch execution history of pipelines on a Bld server.
options
- --verbose Sets the level of verbosity
- -s, --server
The name of the server to fetch history from - -x, --state
Filter the history with state. Possible values are all, initial, queued, running, finished [default: running] - -p, --pipeline
Filter the history with state. Possible values are all, initial, queued, running, finished - -l, --limit
Limit the results [default: 100] - -h, --help Print help
- -V, --version Print version
usage
$ bld hist -s local_server
$ bld hist -s local_server -x initial
$ bld hist -s local_server -x queued
$ bld hist -s local_server -x running
$ bld hist -s local_server -x finished
$ bld hist -s local_server -x faulted
$ bld hist -s local_server -x all
$ bld hist -s local_server -x running -l 200
Init
The init sub-command will initialize a bld project by creating a new .bld directory.
options
- --verbose Sets the level of verbosity
- -s, --server Initialize configuration for a bld server
- -h, --help Print help
- -V, --version Print version
usage
$ bld init
$ bld init -s
Login
The login sub-command initiates the authentication process to a bld server.
options
- --verbose Sets the level of verbosity
- -s, --server
The name of the server to login into - -h, --help Print help
- -V, --version Print version
usage
$ bld login -s local_server
$ Opening a new browser tab to start the login process.
# after authenticating from the browser.
$ Login completed successfully!
Ls
The ls sub-command will list local or server pipelines.
options
- --verbose Sets the level of verbosity
- -s, --server
The name of the server to list pipelines from - -h, --help Print help
- -V, --version Print version
usage
$ bld ls # To list local pipelines
$ bld ls -s local_server # To list server pipelines
Monit
The monit sub-command will connect to a Bld server and monitor the execution of a running pipeline.
options
- --verbose Sets the level of verbosity
- -i, --pipeline-id <PIPELINE_ID> The id of the pipeline to monitor. Takes precedence over pipeline
- -p, --pipeline
The name of the pipeline of which to monitor the last run - -s, --server
The name of the server to monitor the pipeline from - --last Monitor the execution of the last invoked pipeline. Takes precedence over pipeline-id and pipeline
- -h, --help Print help
- -V, --version Print version
usage
$ bld monit -s local_server -p example_pipeline.yaml
$ bld monit -s local_server -i 8f0159e0-7f5c-4dc6-9b1a-70a219d85450
$ bld monit --last
$ bld monit -s local_server --last
Mv
The mv sub-command will move local or server pipelines.
options
- --verbose Sets the level of verbosity
- -p, --pipeline
The pipeline to move - -t, --target
The target path - -s, --server
The name of the server to execute the move operation - -h, --help Print help
- -V, --version Print version
usage
$ bld mv -p source_pipeline.yaml -t target_pipeline.yaml # Move local pipelines
$ bld mv -p source_pipeline.yaml -t target_pipeline.yaml -s local_server # Move server pipelines
Pull
The pull sub-command will fetch the content of a pipeline from a Bld server.
options
- --verbose Sets the level of verbosity
- -p, --pipeline
The name of the bld server - -s, --server
The name of the server to pull the pipeline from - --ignore-deps Do not include other pipeline dependencies
- -h, --help Print help
- -V, --version Print version
usage
$ bld pull -s local_server -p example_pipeline.yaml
$ bld pull -s local_server -p example_pipeline.yaml --ignore-deps
Push
The push sub-command will push new content of a pipeline to a Bld server.
options
- --verbose Sets the level of verbosity
- -p, --pipeline
The name of the pipeline to push - -s, --server
The name of the server to push changes to - --ignore-deps Don't include other pipeline dependencies
- -h, --help Print help
- -V, --version Print version
usage
$ bld push -s local_server -p example_pipeline.yaml
$ bld push -s local_server -p example_pipeline.yaml --ignore-deps
Rm
The rm sub-command will remove a registered pipeline from a Bld server.
options
- --verbose Sets the level of verbosity
- -s, --server
The name of the server to remove from - -p, --pipeline
The name of the pipeline - -h, --help Print help
- -V, --version Print version
usage
$ bld rm -p example_pipeline.yaml
$ bld rm -s local_server -p example_pipeline.yaml
Run
The run sub-command will execute a Bld pipeline either locally or on a server.
options
- --verbose Sets the level of verbosity
- -p, --pipeline
Path to pipeline script [default: default.yaml] - -s, --server
The name of the server to run the pipeline - --detach Detaches from the run execution (for server mode runs)
- -v, --variable
Define value for a variable. Can be used multiple times - -e, --environment
Define value for an environment variable. Can be used multiple times - -h, --help Print help
- -V, --version Print version
usage
$ bld run -p example_pipeline.yaml
$ bld run -p example_pipeline.yaml -v variable1=some_value -v variable2=some_value -e env_variable=some_value
$ bld run -s local_server -p example_pipeline.yaml
$ bld run -s local_server -p example_pipeline.yaml -d
$ bld run -s local_server -p example_pipeline.yaml -v variable1=some_value -v variable2=some_value -e env_variable=some_value
$ bld run -s local_server -p example_pipeline.yaml -v variable1=some_value -v variable2=some_value -e env_variable=some_value -d
Server
The server subcommand will start a Bld server instance.
options
- --verbose Sets the level of verbosity
- -H, --host
The server's host address - -P, --port
The server's port - -h, --help Print help
- -V, --version Print version
usages
$ bld server
$ bld server -H 127.0.0.1 -P 6080
Supervisor
The supervisor sub-command is used by the Bld server and it's advised to not be used it directly.
Worker
The worker sub-command will spawn a new run for a pipeline but is used internally by the bld server so it's advised not to be used directly.
Examples
This section of the book has various examples for building and deploying project using bld pipelines.
Build a dotnet project
This is an example pipeline for building a dotnet project in a container and copying the build artifacts to the host machine.
name: Example dotnet pipeline
version: 2
runs_on:
  image: mcr.microsoft.com/dotnet/sdk:6.0-focal
  pull: true

variables:
  branch: master
  config: release

artifacts:
- method: get
  from: /example_project/src/ExampleProject/bin/bld:var:CONFIG/net6.0
  to: /some/local/path
  after: main

jobs:
  main:
  - git clone -b ${{branch}} https://some-url-to-the-example-project-repository
  - name: Build project
    working_dir: /example_project
    exec:
    - dotnet build -c ${{config}}
Build a nodejs project
This is an example for building a nodejs project in a container and copying the build artifacts to the host machine.
name: Example nodejs pipeline
version: 2
runs_on:
  image: node:lts
  pull: true

variables:
  branch: master
  script: build-prod

artifacts:
- method: get
  from: /example_project/path/to/build/files
  to: /some/local/path
  after: main

jobs:
  main:
  - git clone -b ${{branch}} https://some-url-to-the-example-project-repository
  - name: Build project
    working-dir: /example_project
    exec:
    - npm install
    - npm run ${{SCRIPT}}